In first part, we provisioned a VM. Today we will go over next steps.
Install latest Python
The VM will come with a version of Python pre-installed. Check if the version is sufficient for your needs. If not, you can install latest version of Python using pyenv. Before using pyenv install its dependencies.
In my case I did this by running this script from here:
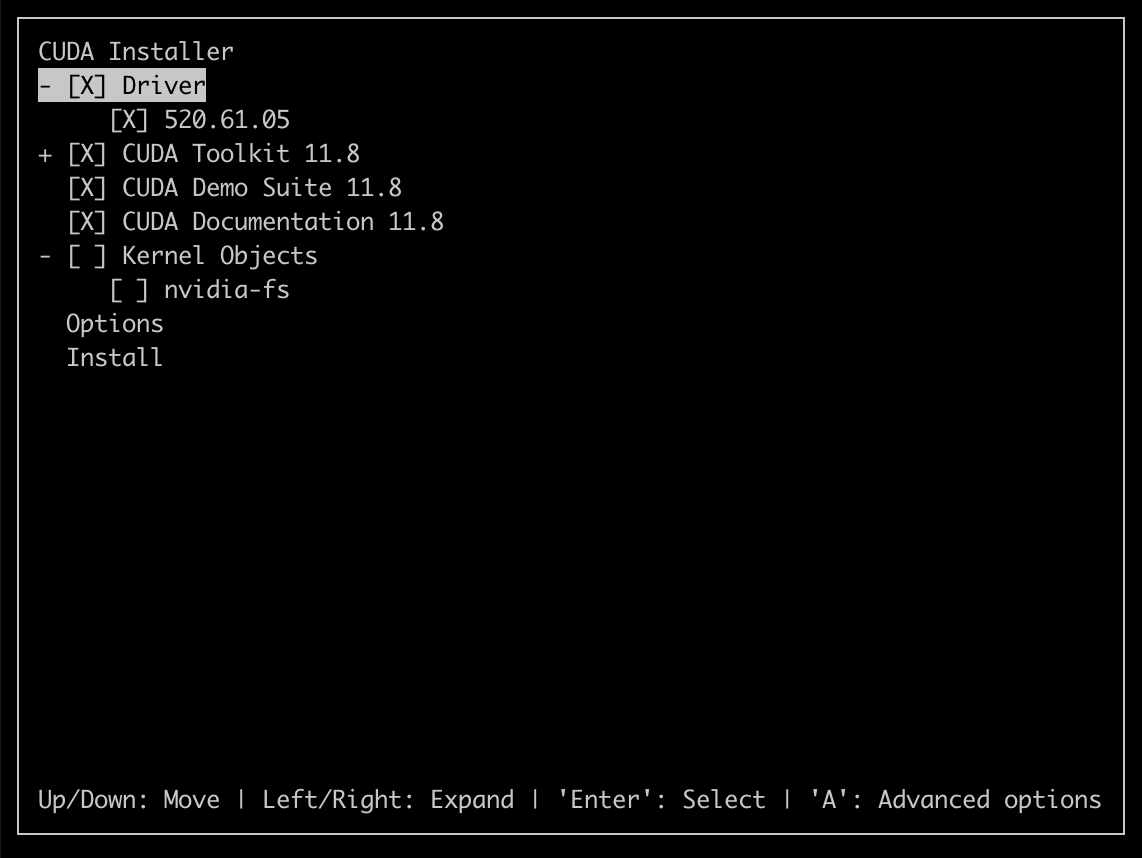
$ sudo python3 install_gpu_driver.py
Later on I realized this installs the device drivers but not the development tools such as nvcc – the CUDA compiler. Do NOT make this mistake in future. You only need to install the CUDA Toolkit. It will install the drivers as well. See Screenshot later in the article.
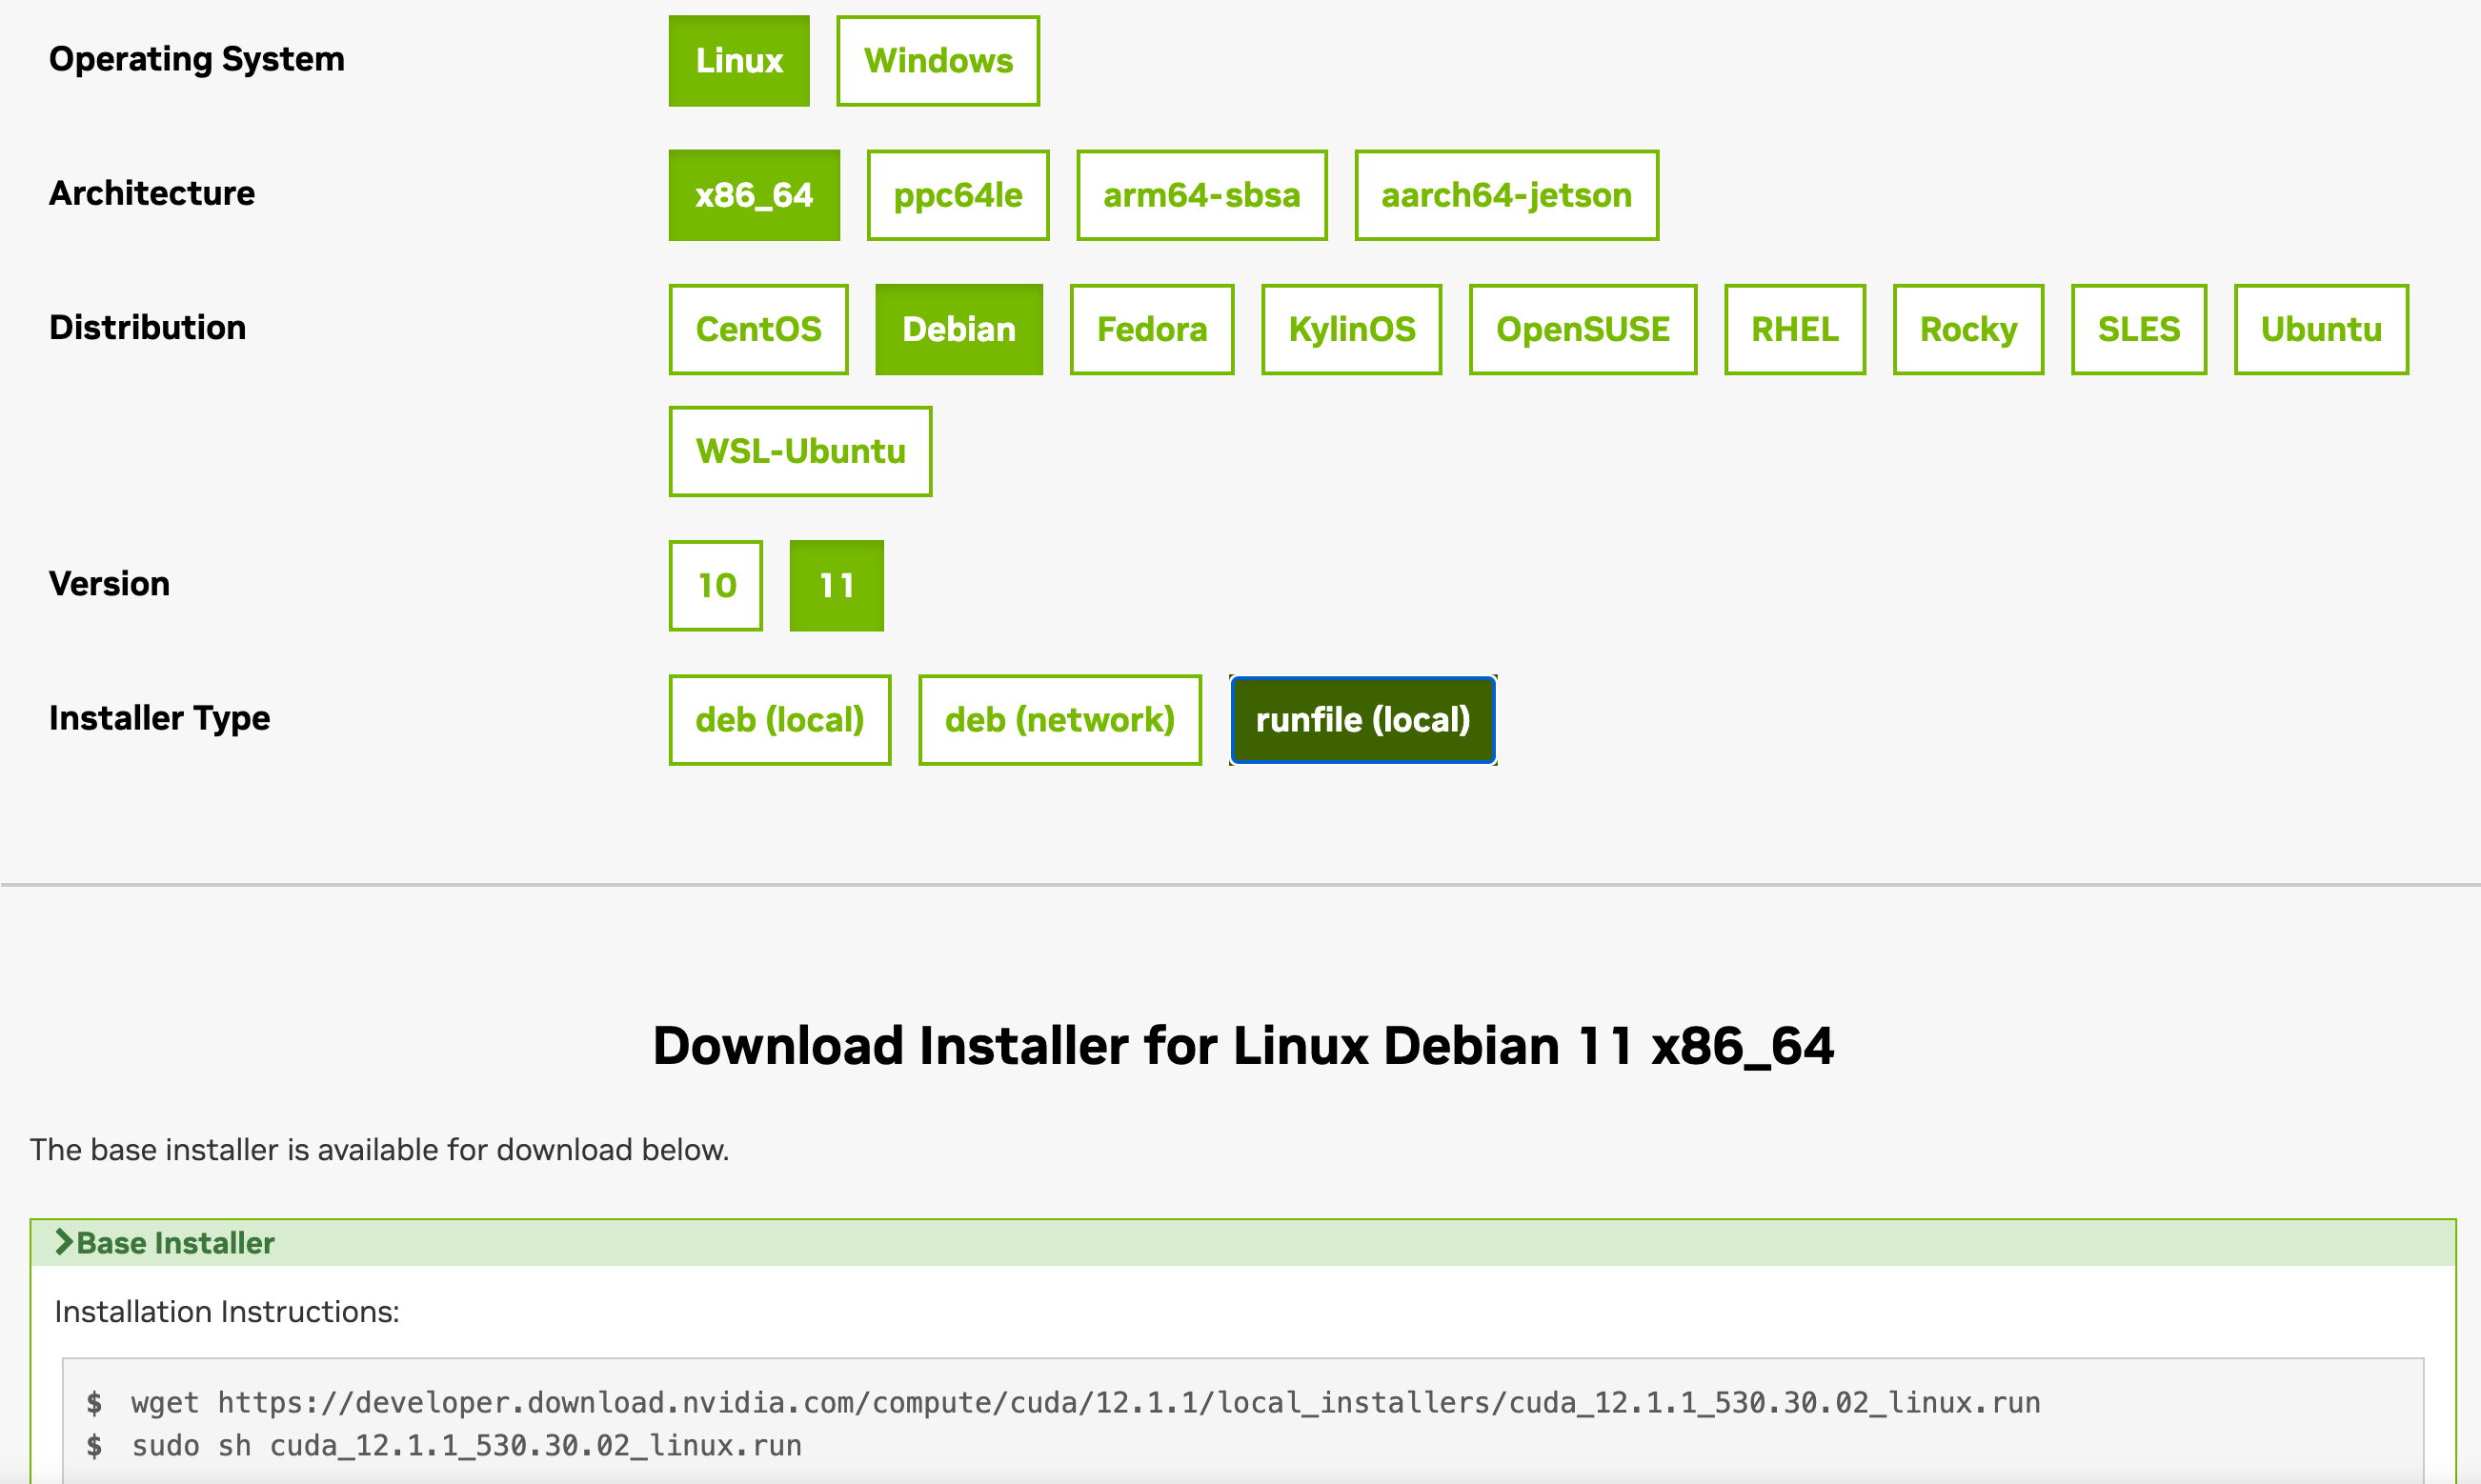
To get nvcc I had to install the CUDA toolkit which I did by following these steps:
The CUDA Toolkit will install drivers as well as NVIDIA compiler tools:
There is an important post-installation step that needs to be done which is to modify your ~./profile (or another file as the case may be) as per the instructions here:
Managed by JVM not OS. Known as user-mode threads.
The idea is to multiplex many virtual threads on few platform threads. Ratio could be 1000:1 or even more. Platform (kernel) threads are the real threads provided by the OS.
How do we do that? by yielding to another vthread when a vthread is blocked such as when waiting for I/O.
So how do we yield? The stack frame at yield point is moved from stack memory to heap memory. When vthread resumes, the frame is loaded back from heap to stack and method can resume from the point where it yielded.
When the method resumes, it might very well be running on a different platform thread than when it was suspended
The performance overhead associated with context-switching of a vthread is the cost to move stack frame to heap and vice-versa. This is very small compared to context switch of a platform thread.
The most interesting part: You write normal synchronous blocking code but wrap it in a vthread. JVM handles the rest – esp. the yielding part. E.g., you write normal synchronous blocking code using a JDBC driver to access a database. JVM will automatically yield the vthread when it detects that its waiting (blocked) for I/O to complete.
Virtual threads will help in improving performance of I/O-bound applications. Don’t try to run CPU-bound workload in a vthread – it will degrade performance.
Lastly, this is what Node.js has been doing for more than past 10 years with its beautiful async-await pattern. Multiplex thousands of requests (tasks) on a single platform thread and yield a task whenever its waiting for an I/O operation to complete. Somewhere in a blog post I read how Java vthread eliminates the distinction between a red and blue colored function, but one could argue Node.js is better because you can actually see the yield point in front of your eyes. With Java vthread, its hidden and you don’t see it.
Making notes of this so I will remember later on. You can install a deep learning VM from the marketplace but I did not do that. I did it the hard way. I started with this:
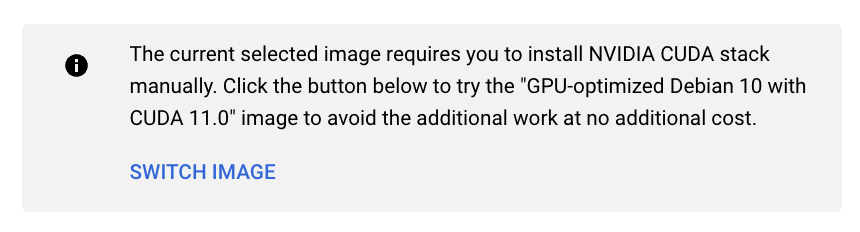
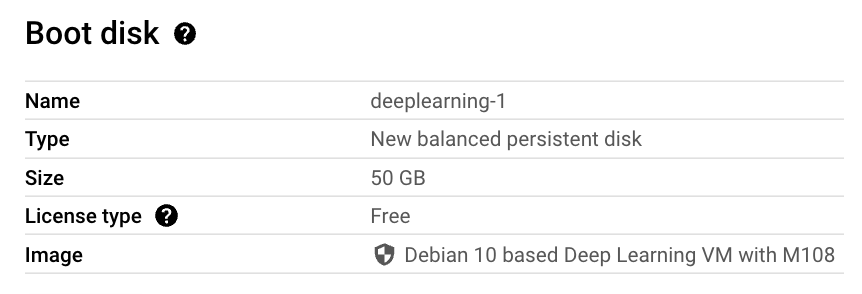
Choosing the wrong Boot disk image
This section is for posterity. Do yourself a favor. Skip it and move on to next section.
Under the boot disk I selected following Deep Learning image (as suggested by Google) so I would get the NVIDIA drivers pre-installed :
DO NOT MAKE THIS MISTAKE
and that was my mistake. This image uses old version of Debian. The bigger problem is that it comes with version 2.28 of libc which gave me this issue later on when I tried to run privateGPT. I was never able to recover from the issue. In my attempts to fix it, I compiled version 2.29 of libc. But you can’t just replace an older version of libc with a newer version so that you can make one program work. What about all the other programs who might be relying on the other version. In fact, I got bit hard, very hard. I thought let me move (rename) the older version, try if newer version works and if it doesn’t I’ll revert back to older version. So I typed following command in the /lib/x86_64-linux-gnu directory:
$ sudo mv libc.so.6 libc-2.28.so.6
libc.so.6 is actually a symlink to libc-2.28.so. Anyway, this is one command you never want to type. All hell broke loose after that. All shell commands stopped working. Reason? When you run any (well not any but pretty much almost all of them) shell command, it loads the libc.so C library (libc is the standard C library). Now after this rename, the programs cannot find this library and so they stop working. You can’t rename (mv) the file back again, because mv no longer works! See this SO post. There is an environment variable LD_PRELOAD using which you can explicitly specify which libraries should be pre-loaded before running a command. So you think one could do:
No, and for good reason. Well configured systems disallow (or ignore) and environment variables such as LD_PRELOAD flag when sudo is run. Not doing this would open up a security vulnerability. Google ld_preload sudo exploit. e.g. see this article.
The TL;DR was that I was SOL. I spent an entire day but could never come out of the hole. I had already spend better half of the day installing and setting up various tools before I ran into the libc error. all the work was wasted.
Choosing the right boot disk image
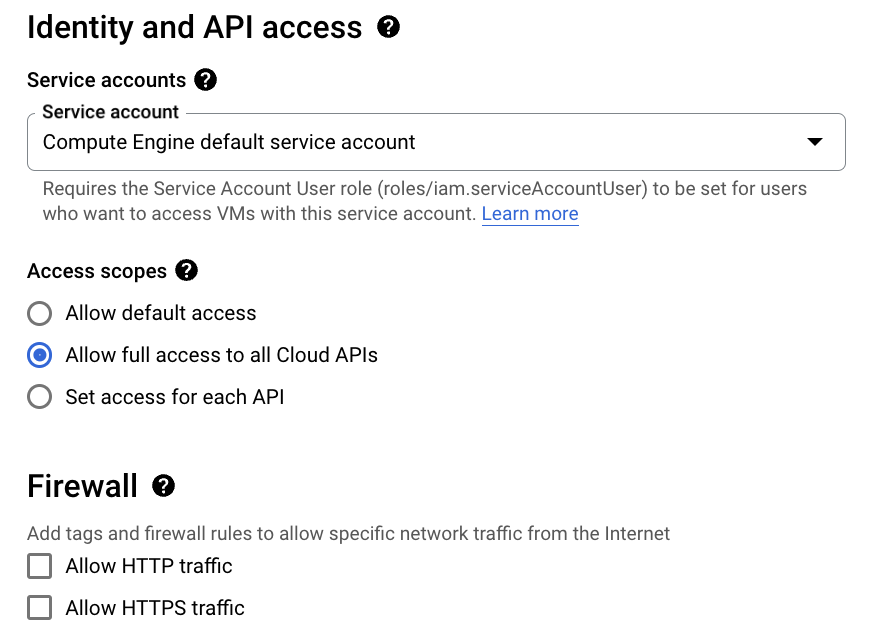
Next day I repeated the steps and this time I selected a Debian 11 image albeit without any graphics drivers pre-installed on it:
For the boot disk I only chose 50 GB. I added another 400 GB disk to store the data and the application. You have to follow a lot of steps to be able to use the disk. The disk has to be formatted, then mounted and then /etc/fstab has to be edited so the mount persists when the VM reboots. Fortunately Google has documented them nicely over here. Make sure you follow them as they have specified starting from here.
Tip: Make sure you set following environment variables in ~/.profile in order to use this additional disk for storing NLP models and datasets:
In above I have mounted the additional disk to /app folder on the VM. If you don’t do this step transformers and huggingface will store models and datasets under ~/.cache and you will quickly run out of disk space on the OS disk.
Securing the VM
You should secure the VM to your liking:
In above I am allowing programs running on the VM to connect to all GCP services like Google Cloud Storage etc. and disabling anyone from connecting to this VM over HTTP(S). These settings can be changed later on if you desire from the web console.
VPC Networking
You may even put the VM under a VPC Network and remove assigning a public IP to the VM. The setting for this is under Advanced Options -> Networking -> Network interfaces. You should have a VPC Network (and a subnet) already setup previously before you can put the VM in the private network. If you are in a corp environment, you almost invariably want to do this.
By default a VPC Network is not configured to allow VMs in it to connect to the internet. To fix this one has to set up a Cloud NAT Gateway and add the subnets to the NAT Gateway. This requires careful configuration. Keep notes of what you are doing, so you can revert if you break something.
That’s it for this post. In next post we’ll cover installing graphics device drivers and other development tools and libraries such as Python.
Wouldn’t it be nice if you could run a private instance of ChatGPT on your company’s private and confidential data? Well, you can do something like it with privateGPT. Although it does not use ChatGPT as that is a proprietary solution, it uses gpt4all which is a freely and publicly available LLM (large language model). Of course, its not as powerful as ChatGPT.
Getting Started
Download code from github. In my case I am synced to commit 60e6bd25eb7e54a6d62ab0a9642c09170c1729e3 which worked for me. Lot of times, you download the code, try to run it and it does not work. Then you have to spend hours and days debugging it.
put all your private documents on which you want to run “ChatGPT” inside source_documents
rename example.env to .env and edit as necessary
run python ingest.py
How it works
Running ingest.py is effectively indexing your documents in search lingo.
After that when you run privateGPT.py, in a nutshell, it uses what is known as retriever-reader model which basically works in 2 steps:
Step 1: A search is performed on the user provided input (query) against your private documents. This is where the index created by ingest.py is used.
Step 2: The search results from previous step are used as context. The query + context is given to a LLM (gpt4all) to answer.
Here you can see it in action. Below is showing the query and context just before its sent to the LLM. The query I typed in was “who was the wife of adolf hitler”. And my private document store just contained one file state_of_the_union.txt which comes with the repo. Below string is sent verbatim to the LLM (gpt4all). So its as if you typed in the following on ChatGPT prompt:
b"Use the following pieces of context to answer the question at the end. If you don't know the answer, just say that you don't know, don't try to make up an answer.\n\nWe don\xe2\x80\x99t know for sure if a burn pit was the cause of his brain cancer, or the diseases of so many of our troops. \n\nBut I\xe2\x80\x99m committed to finding out everything we can. \n\nCommitted to military families like Danielle Robinson from Ohio. \n\nThe widow of Sergeant First Class Heath Robinson. \n\nHe was born a soldier. Army National Guard. Combat medic in Kosovo and Iraq. \n\nStationed near Baghdad, just yards from burn pits the size of football fields.\n\nA former top litigator in private practice. A former federal public defender. And from a family of public school educators and police officers. A consensus builder. Since she\xe2\x80\x99s been nominated, she\xe2\x80\x99s received a broad range of support\xe2\x80\x94from the Fraternal Order of Police to former judges appointed by Democrats and Republicans. \n\nAnd if we are to advance liberty and justice, we need to secure the Border and fix the immigration system.\n\nSix days ago, Russia\xe2\x80\x99s Vladimir Putin sought to shake the foundations of the free world thinking he could make it bend to his menacing ways. But he badly miscalculated. \n\nHe thought he could roll into Ukraine and the world would roll over. Instead he met a wall of strength he never imagined. \n\nHe met the Ukrainian people. \n\nFrom President Zelenskyy to every Ukrainian, their fearlessness, their courage, their determination, inspires the world.\n\nOne was stationed at bases and breathing in toxic smoke from \xe2\x80\x9cburn pits\xe2\x80\x9d that incinerated wastes of war\xe2\x80\x94medical and hazard material, jet fuel, and more. \n\nWhen they came home, many of the world\xe2\x80\x99s fittest and best trained warriors were never the same. \n\nHeadaches. Numbness. Dizziness. \n\nA cancer that would put them in a flag-draped coffin. \n\nI know. \n\nOne of those soldiers was my son Major Beau Biden.\n\nQuestion: who was the wife of adolf hitler?\nHelpful Answer:"
below is the call stack just before call to LLM:
File "/github/privateGPT/privateGPT.py", line 76, in
    main()


  File "/github/privateGPT/privateGPT.py", line 48, in main
    res = qa(query)


  File "/github/privateGPT/venv/lib/python3.10/site-packages/langchain/chains/base.py", line 134, in __call__
    self._call(inputs, run_manager=run_manager)


  File "/github/privateGPT/venv/lib/python3.10/site-packages/langchain/chains/retrieval_qa/base.py", line 120, in _call
    answer = self.combine_documents_chain.run(


  File "/github/privateGPT/venv/lib/python3.10/site-packages/langchain/chains/base.py", line 239, in run
    return self(kwargs, callbacks=callbacks)[self.output_keys[0]]


  File "/github/privateGPT/venv/lib/python3.10/site-packages/langchain/chains/base.py", line 134, in __call__
    self._call(inputs, run_manager=run_manager)


  File "/github/privateGPT/venv/lib/python3.10/site-packages/langchain/chains/combine_documents/base.py", line 84, in _call
    output, extra_return_dict = self.combine_docs(


  File "/github/privateGPT/venv/lib/python3.10/site-packages/langchain/chains/combine_documents/stuff.py", line 87, in combine_docs
    return self.llm_chain.predict(callbacks=callbacks, **inputs), {}


  File "/github/privateGPT/venv/lib/python3.10/site-packages/langchain/chains/llm.py", line 213, in predict
    return self(kwargs, callbacks=callbacks)[self.output_key]


  File "/github/privateGPT/venv/lib/python3.10/site-packages/langchain/chains/base.py", line 134, in __call__
    self._call(inputs, run_manager=run_manager)


  File "/github/privateGPT/venv/lib/python3.10/site-packages/langchain/chains/llm.py", line 69, in _call
    response = self.generate([inputs], run_manager=run_manager)


  File "/github/privateGPT/venv/lib/python3.10/site-packages/langchain/chains/llm.py", line 79, in generate
    return self.llm.generate_prompt(


  File "/github/privateGPT/venv/lib/python3.10/site-packages/langchain/llms/base.py", line 134, in generate_prompt
    return self.generate(prompt_strings, stop=stop, callbacks=callbacks)


  File "/github/privateGPT/venv/lib/python3.10/site-packages/langchain/llms/base.py", line 185, in generate
    self._generate(prompts, stop=stop, run_manager=run_manager)


  File "/github/privateGPT/venv/lib/python3.10/site-packages/langchain/llms/base.py", line 411, in _generate
    self._call(prompt, stop=stop, run_manager=run_manager)


  File "/github/privateGPT/venv/lib/python3.10/site-packages/langchain/llms/gpt4all.py", line 195, in _call
    for token in self.client.generate(prompt, **self._default_params()):


  File "/github/privateGPT/venv/lib/python3.10/site-packages/gpt4all/gpt4all.py", line 170, in generate
    return self.model.generate(prompt, streaming=streaming, **generate_kwargs)


  File "/github/privateGPT/venv/lib/python3.10/site-packages/gpt4all/pyllmodel.py", line 220, in generate
    prompt,
The call to LLM is this inside /gpt4all/pyllmodel.py:
This will call C/C++ code which will do the HEAVY work. No data is sent to any remote server so you can be sure your private data remains private.
Tips
Running ingest.py for the first time will download some files. Where are they stored?
% ls -al ~/.cache/torch/sentence_transformers/sentence-transformers_all-MiniLM-L6-v2
total 179080
drwxr-xr-x  16 me  staff       512 May 25 13:00 .
drwxr-xr-x   3 me  staff        96 May 25 13:00 ..
-rw-r--r--   1 me  staff      1175 May 25 13:00 .gitattributes
drwxr-xr-x   3 me  staff        96 May 25 13:00 1_Pooling
-rw-r--r--   1 me  staff     10610 May 25 13:00 README.md
-rw-r--r--   1 me  staff       612 May 25 13:00 config.json
-rw-r--r--   1 me  staff       116 May 25 13:00 config_sentence_transformers.json
-rw-r--r--   1 me  staff     39265 May 25 13:00 data_config.json
-rw-r--r--   1 me  staff       349 May 25 13:00 modules.json
-rw-r--r--   1 me  staff  90888945 May 25 13:00 pytorch_model.bin
-rw-r--r--   1 me  staff        53 May 25 13:00 sentence_bert_config.json
-rw-r--r--   1 me  staff       112 May 25 13:00 special_tokens_map.json
-rw-r--r--   1 me  staff    466247 May 25 13:00 tokenizer.json
-rw-r--r--   1 me  staff       350 May 25 13:00 tokenizer_config.json
-rw-r--r--   1 me  staff     13156 May 25 13:00 train_script.py
-rw-r--r--   1 me  staff    231508 May 25 13:00 vocab.txt
More on the internals
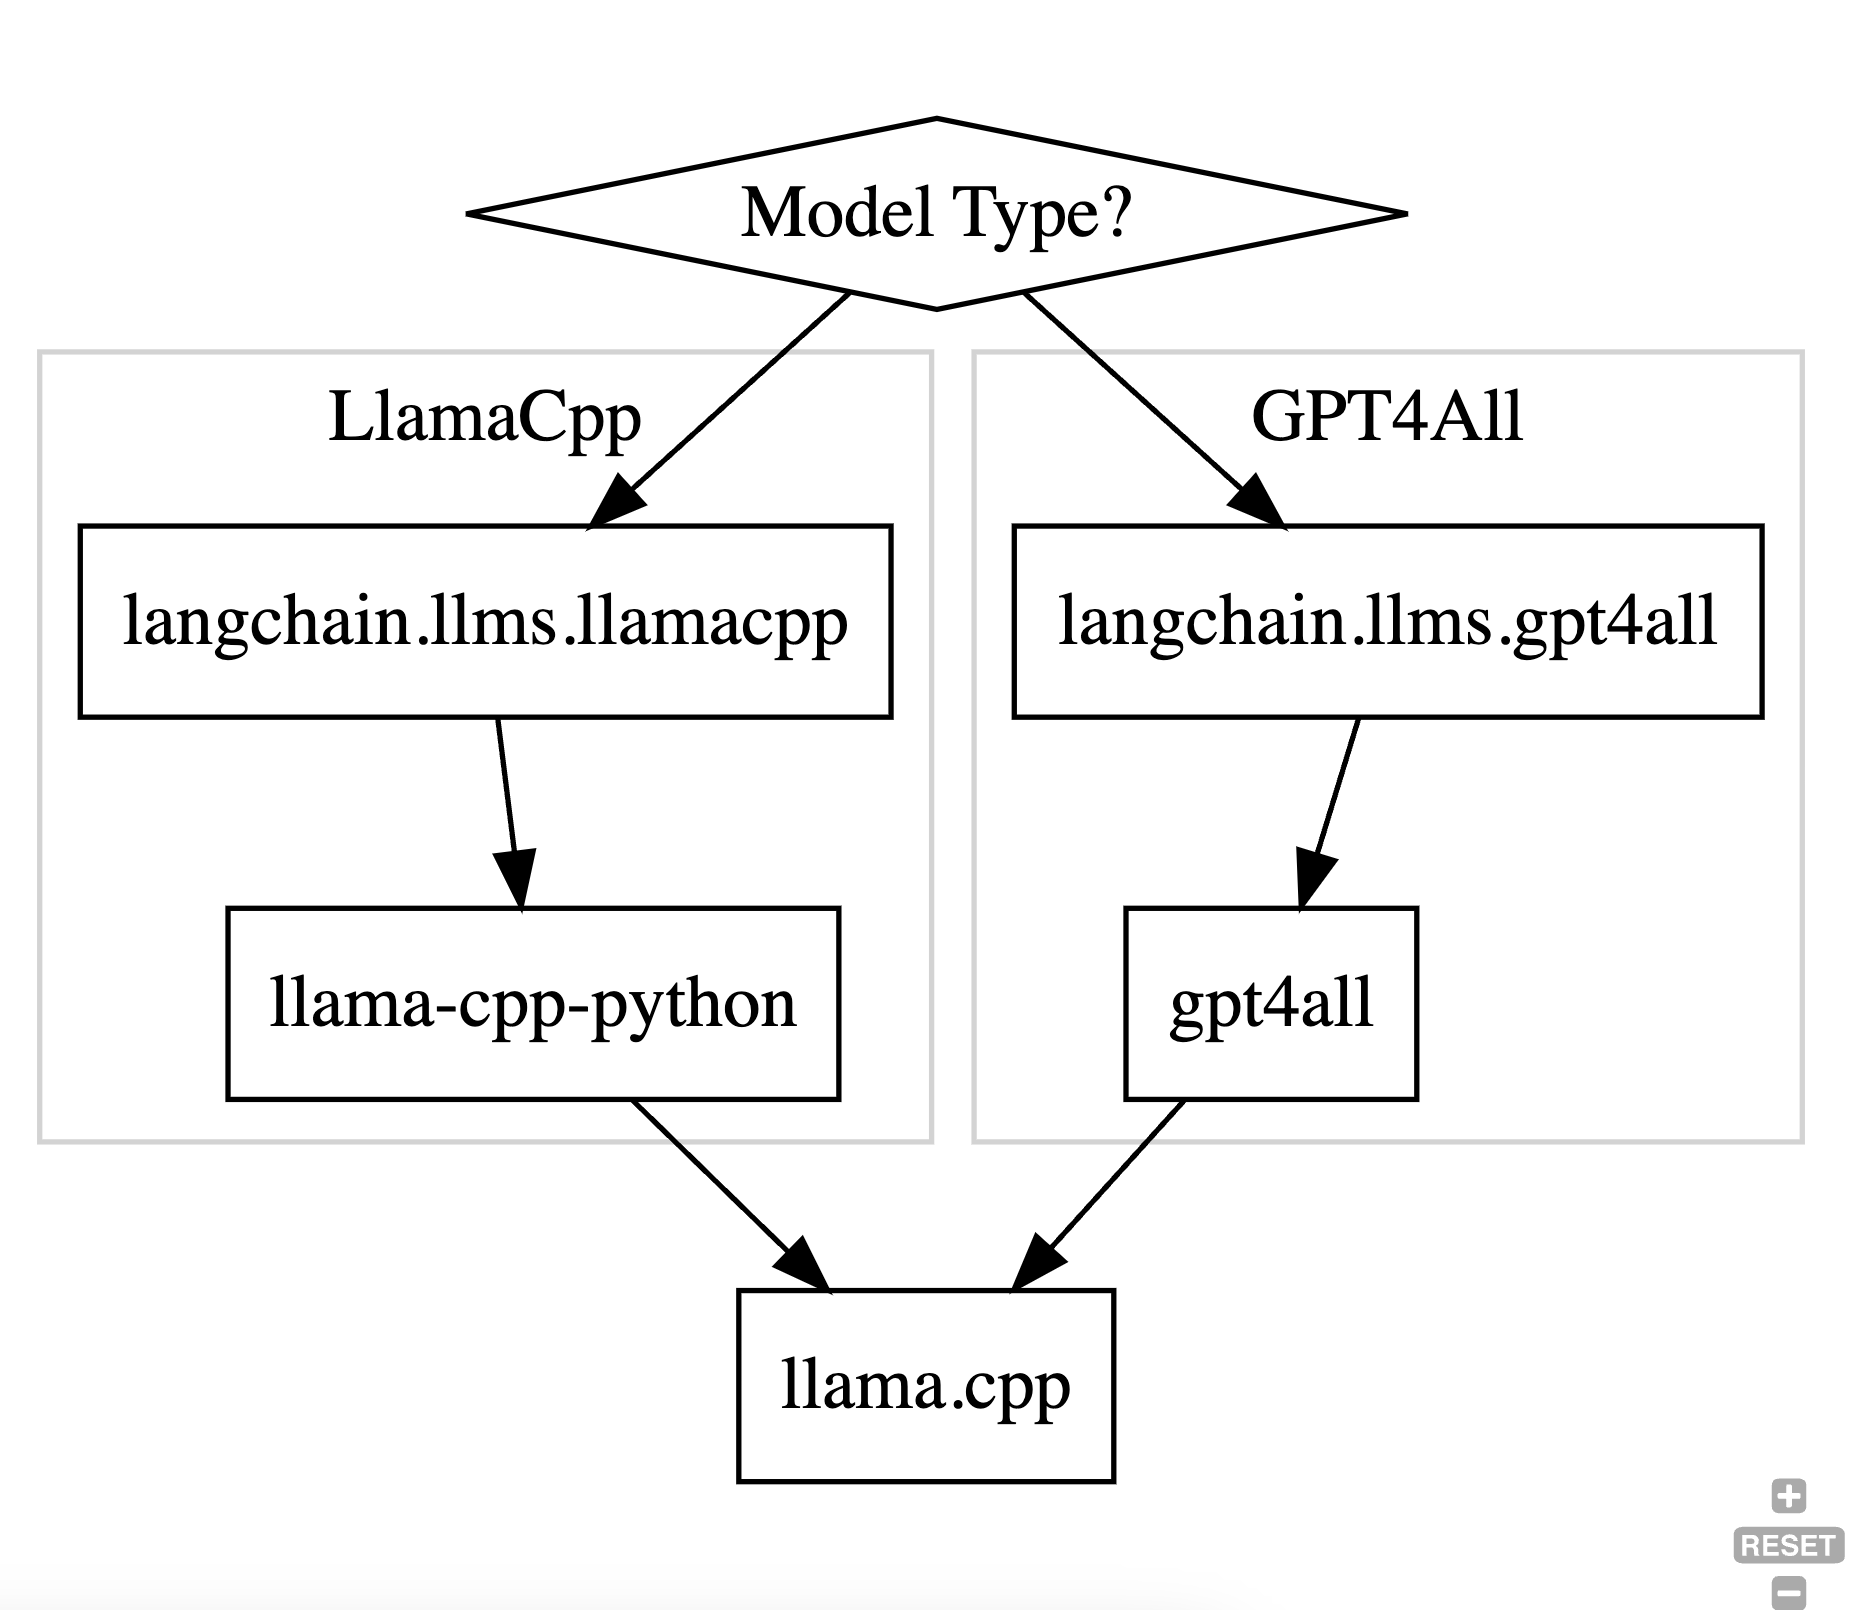
PrivateGPT uses langchain and langchain provides two kinds of models:
from langchain.llms import GPT4All, LlamaCpp
...
match model_type:
        case "LlamaCpp":
            llm = LlamaCpp(model_path=model_path, n_ctx=model_n_ctx, callbacks=callbacks, verbose=False)
        case "GPT4All":
            llm = GPT4All(model=model_path, n_ctx=model_n_ctx, backend='gptj', callbacks=callbacks, verbose=False)
        case _default:
            print(f"Model {model_type} not supported!")
            exit;
However, note that both these model types use the same llama.cpp library to do the heavy lifting and run the actual inference. This library is written in C/C++ and uses the GGML library for doing the computations – it does not use PyTorch or TensorFlow. AFAIU, the GGML library was originally developed to run inference on the edge (i.e., run on client device on a CPU) but has since added partial GPU support to it.
The way the two model types interop with the C++ library is different and shown in the diagram below:
AFAIU, in theory only one branch is needed in the flowchart above. On gpt4all’s website it states:
Currently, there are three different model architectures that are supported:
GPTJ – Based off of the GPT-J architecture with examples found here
LLAMA – Based off of the LLAMA architecture with examples found here
MPT – Based off of Mosaic ML’s MPT architecture with examples found here
and further:
How does GPT4All make these models available for CPU inference?
By leveraging the ggml library written by Georgi Gerganov
the ggml library is reference to llama.cpp.
Using llama model with GPT4All
I wanted to run Vicuna with privateGPT. To do that I first tried using a LlamaCpp model type but ran into this issue. You may not run into this issue. It turns out you can run a Llama model using GPT4All since it uses same llama.cpp underneath as LLamaCpp. The steps to use GPT4all to run a LLama model are as follows:
first I uninstalled gpt4all and langchain and installed following versions: gpt4all==0.3.4, langchain==0.0.202
That’s it! You can now run vicuna with privateGPT.
One limitation is that the pre-built llama.cpp binaries that come with gpt4all don’t utilize the GPU on Mac. So inference is very slow. To fix this:
1. you can build llama.cpp yourself as explained here (make sure you also use the -DBUILD_SHARED_LIBS=ON flag with cmake otherwise you won’t get .dylib in the output; you will need to install cmake as well) and
2. replace the binary in venv/lib/python3.10/site-packages/gpt4all/llmodel_DO_NOT_MODIFY/build with your custom build. DO THIS WITH CAUTION. Make a copy of the old binary in case something goes wrong and you need to restore it.
Clean code is code that looks like it was written by someone who cares.
Software is meant to be soft – changeable, malleable. Well architected code is easy to change. Not every change takes 6 months.
Software is about two things: behavior and structure. Behavior is about the business requirements. Structure is about architecture. People tend to emphasize the wrong variable (behavior). If we have code that works today but is so complex that any change is impossible then the software is useless as requirements will change. However, if we have code that does not work but can be easily changed, we can always rework it to fit the business requirements.
Framework authors have their best interests in mind. Whenever you use a framework, you are making a big commitment to it. What if later on the framework does not address some requirement? Or what if it has a bug that you need urgently fixed and is getting in your way? You have to balance the cost vs. benefit. Choosing a framework is a build vs. buy decision.
Good architecture defers decision making. He gives example of using flat-files in Fitnesse and ultimately never using any database.
Agile process is about two things: measuring team velocity and burn down chart iteratively and using them to keep stakeholders updated of any project delays in timely manner.
TDD or unit tests give us confidence to make changes to the code as we can run the tests and be sure we haven’t broken anything.
Test the behavior not the implementation.
If you cannot meet the schedule, one of the following would have to be compromised:
the schedule itself
quality (don’t do this)
staff (add more; doesn’t always work; only works when you are short staffed)
Cloud SQL is a managed service in GCP where Google will run and manage MySQL, Postgres or SQL Server for you. A user can authenticate to Cloud SQL in two ways:
Built-in: This is the conventional way. You create a user e.g. CREATE USER testuser WITH ENCRYPTED PASSWORD '2O3vdR4F'; and then user uses this password to log into the database server.
IAM: This method uses your GCP identity (your GCP account) to log into the server. Azure calls this managed identity if I am not mistaken.
Using IAM has few advantages I believe. Say you have 100 servers. With IAM you don’t have to create 100 accounts for the same user and then manage those accounts (e.g., think when you want to revoke access).
I don’t know how IAM is exactly implemented and very curious to learn about it. What I do know is that when you create an IAM user account (e.g., from GCP’s web console), a user with same email as your GCP account is created in the system. This user can be seen with familiar \du command. So this tells me that Google internally executes the CREATE USER command for us. Come on, how else could it work? From point of view of pg, it doesn’t know the difference between built-in or IAM users. for it, every user is built-in.
If a user is created, there must also be an associated password. My guess is that this password is periodically (and frequently – of the order of minutes may be) rotated behind the scenes for us (which is another reason to prefer IAM over built-in identity). we never get to know that password so how can we connect using IAM?
This is where you have to use the Cloud SQL Proxy provided by Google. This is a program you run on your machine. It authenticates to GCP using the credentials stored on your machine and then is able to read the password from pg using super privileges it has (my guess). If you are using psql, pgAdmin or DBeaver you connect to the proxy that runs locally and the proxy connects to Cloud SQL. This is how you can access Cloud SQL from your local machine.
But what about your application? For this, Google provides libraries that do the same thing as the proxy. E.g., if you are programming in Java, you will use the Java library and have code like:
Add dependency to com.google.cloud.sql:postgres-socket-factory (in your pom.xml or build.gradle file). The connection establishment is offloaded (outsourced) to this library. From the docs:
The provided value is a class name to use as the SocketFactory when establishing a socket connection. This may be used to create unix sockets instead of normal sockets. The class name specified by socketFactory must extend javax.net.SocketFactory and be available to the driver’s classloader. This class must have a zero-argument constructor, a single-argument constructor taking a String argument, or a single-argument constructor taking a Properties argument. The Properties object will contain all the connection parameters. The String argument will have the value of the socketFactoryArg connection parameter.
Think of this as the Cloud SQL Proxy but running embedded in your application instead of a separate program.
Recently, Google added support for IAM auth to Node.js which was missing for a long time (version 0.3.0). I had a chance to use it and it does work!
const { Connector } = require('@google-cloud/cloud-sql-connector');
const {Pool} = require('pg');

const connector = new Connector();

const connect = async () => {
    const clientOpts = await connector.getOptions({
        instanceConnectionName: 'project:region:instance',
        ipType: 'PUBLIC',
        authType: 'IAM'
      });
    console.log(clientOpts);
    const pool = new Pool({
        ...clientOpts,
        user: 'mygcpid@mycompany.com',
        password: 'dummy',
        database: 'xxx',
        max: 5
      });
      const {rows} = await pool.query('SELECT NOW()');
      console.table(rows); // prints returned time value from server

      await pool.end();
      connector.close();
}
Understanding the Internals
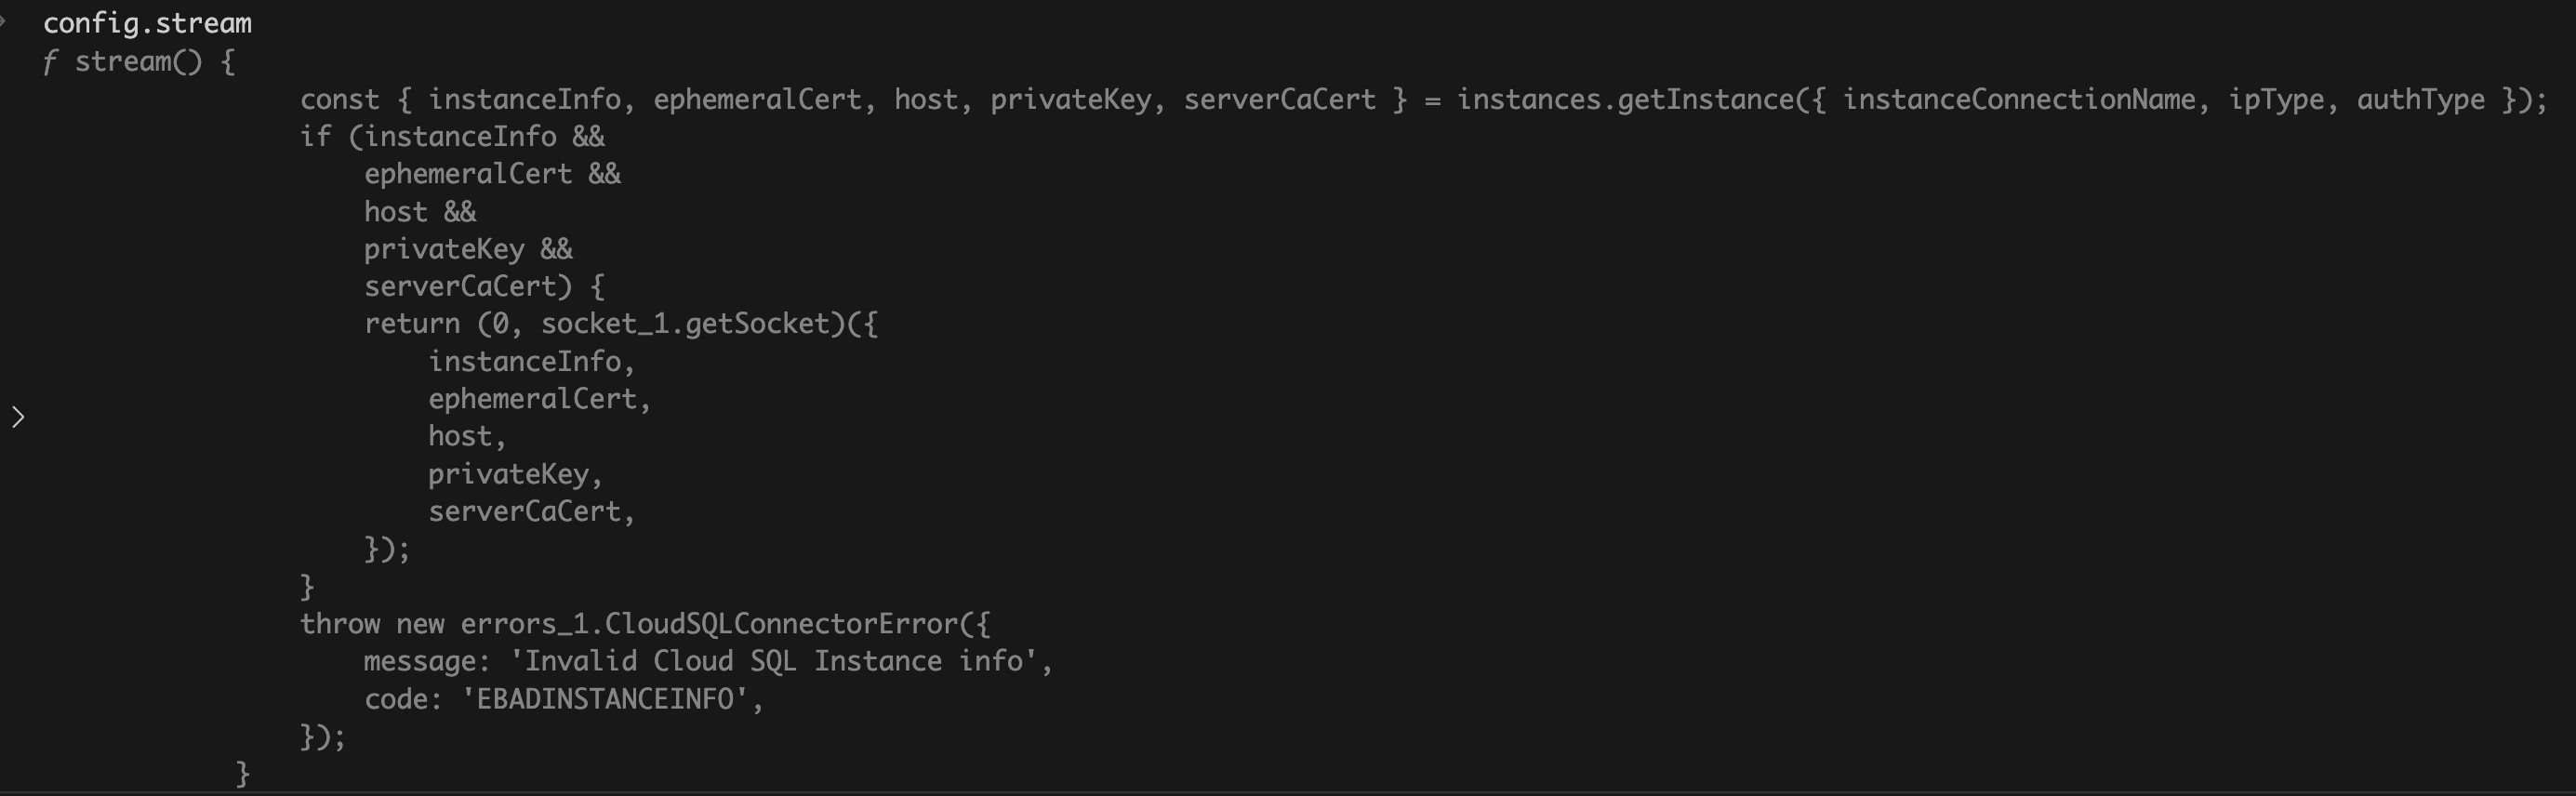
I think there is a subtle difference between how this works vs. Java (on analyzing further, I think both Java and Node.js work the same way; refer this for the TL;DR). The Node.js code is using the pg library to establish the connection (observe the code where the Pool class from pg is being instantiated). This library does not know about built-in vs. IAM. It will connect to postgres by passing a password. So my guess was that clientOpts would contain the password to connect to postgres but I was wrong. clientOpts simply contains two fields:
{ stream: [Function: stream], ssl: false }
The only thing I can think of is the stream IS the connection to Cloud SQL and the pg library does NOT establish connection to postgres (it turned out to be false; the rabbit hole goes much deeper; read full post for details but I think most readers can stop here). The connection is established by @google-cloud/cloud-sql-connector (observe the await when calling connector.getOptions) and pg uses the provided stream. E.g., I can see this interface in pg TypeScript declarations:
I think its a matter of getting lucky. Basically @google-cloud/cloud-sql-connector is relying on an assumption that if stream is passed-in to pg, then pg will skip creating connections (again turned out to be more nuanced) but I don’t think this is a documented feature of the pg library.
class Connection extends EventEmitter {
  constructor(config) {
    super()
    config = config || {}

    this.stream = config.stream || new net.Socket()
this is where @google-cloud/cloud-sql-connector is effectively injecting the pre-established connection into pg.
and the stacktrace:
trace
    at eval (eval-dd4d2821.repl:1:9)
    at new Connection (/Users//node/cloudsql-iam-auth-test/node_modules/pg/lib/connection.js:15:5)
    at new Client (/Users//node/cloudsql-iam-auth-test/node_modules/pg/lib/client.js:48:7)
    at BoundPool.newClient (/Users//node/cloudsql-iam-auth-test/node_modules/pg-pool/index.js:213:20)
    at BoundPool.connect (/Users//node/cloudsql-iam-auth-test/node_modules/pg-pool/index.js:207:10)
    at BoundPool.query (/Users/node/cloudsql-iam-auth-test/node_modules/pg-pool/index.js:394:10)
    at connect (/Users//node/cloudsql-iam-auth-test/index.js:20:33)
However if I am not mistaken, the code:
this.stream = config.stream || new net.Socket()
means that even though we create a Pool, that pool will always contain a single connection because a new net.Socket will never be created like this! TODO: confirm and validate. This is a big bug!
On testing, it turned out I was wrong! Sample test code:
const main = async() => {
    const pool = await createPool();
    for (let i = 0; i < 20; i++) {
        await pool.connect();
    }
    await pool.end();
    connector.close();
}
On pg server:
rrm=> SELECT count(*) FROM pg_stat_activity where usename = 'me';
 count
-------
    20
(1 row)
So its doing the right thing! How come? Take a look at this:
if (typeof this.stream === 'function') {
      this.stream = this.stream(config)
}
At time of if check this.stream equals config.stream which is the stream injected into pg.
this.stream === config.stream
true
The if check evaluates to true and then this.stream gets replaced by config.stream(config). The config.stream function creates a NEW stream which gives a NEW connection. (I wasn’t able to step into the config.stream call). This is where the connection is being established:
this.stream.once('connect', function () {
      if (self._keepAlive) {
        self.stream.setKeepAlive(true, self._keepAliveInitialDelayMillis)
      }
      self.emit('connect')
    }
The code in @google-cloud/cloud-sql-connector that creates the stream which is passed to pg:
At this point, this was enough for me. Again, if anything to be learned or taken away I feel this code:
this.stream = config.stream || new net.Socket()
    if (typeof this.stream === 'function') {
      this.stream = this.stream(config)
    }
which makes it all work, is highly custom (internal) and not part of public API of pg library. The library author can change the internals without notice and its never a good idea to rely on undocumented features.
The Java wrapper that makes calls to above library.
WARNING: You will need JDK 20 because the Java wrapper has been compiled with JDK 20 (when I wrote this blog post). If you have earlier version of JDK you will get a runtime error. Try it. At time of this writing JDK 20 was not available on Debian package repository so I could not install it directly using sudo apt-get install. I first downloaded the .deb package from https://download.oracle.com/java/20/latest/jdk-20_linux-x64_bin.deb and then ran sudo apt-get install passing the .deb file as argument. You will need Maven as well and set the JAVA_HOME environment variable.
Installing Pre-requisites
First I installed the HDF5 package from the official site. It requires you to create an account. Update: alternatively,
get the package from here (below link is for arm64 i.e., non-intel CPU):
You can give any values for the -DgroupId, -DartifactId and -Dversion. You just have to use the same values while importing the dependency in pom.xml
Verify there is a jar in ~/.m2/repository/hdf/hdf5lib/H5/hdf5lib/1.14.1
Add reference to hdf5 jar in pom.xml
      hdf.hdf5lib.H5
      hdf5lib
      1.14.1
Here make sure you use the same values of groupId, artifactId and version that you used in step 5 otherwise maven will not be able to import the dependency.
When running Java program it should be able to find hdf5_java.jar file in the classpath. On Mac, I was able to do this by setting JAVA_LIBRARY_PATH to the location where hdf5_java.jar is stored but on Ubuntu setting above variable did not help. Instead I had to set the LD_LIBRARY_PATH. On Windows you have to set the PATH. To best of my knowledge and experience, setting the java.library.path system property makes no difference and will not help. What makes this frustrating is that you are likely to read different things on different websites regarding these variables and which is the right one to set. I once ran a program on Ubuntu in AWS. I did not set LD_LIBRARY_PATH but set the JAVA_LIBRARY_PATH and it worked. Then when I ran same program on WSL, it did not work! Setting LD_LIBRARY_PATH worked. In both cases I used same version of JDK (JDK21). If things don’t work as expected, try setting all 3 of them! It cannot hurt. And refer source code that does the loading of the dll if still stuck.
Next, let us come to the code. You can find a collection of code snippets here and here. Also there is a collection of examples you can find in `~/Library/HDF5/1.14.1/share/HDF5Examples/JAVA/. replace the path with the location where you installed HDF5.
Reading HDF5 file
I don’t provide complete code but the below code snippet in combination with references above should get you there for the most part:
import hdf.hdf5lib.H5;
import hdf.hdf5lib.HDF5Constants;

private static float[][] read2DTensor(long fileId, String datasetName) {
        long datasetId = H5.H5Dopen(fileId, datasetName, HDF5Constants.H5P_DEFAULT);
        long dataspaceId = H5.H5Dget_space(datasetId);

        // Get the number of dimensions in the dataspace (rank of the tensor)
        int rank = H5.H5Sget_simple_extent_ndims(dataspaceId);

        // Get the length of the tensor along each dimension
        long[] dimensions = new long[rank];
        H5.H5Sget_simple_extent_dims(dataspaceId, dimensions, null);

        // Read the data
        int n = 1;
        for (int i = 0; i < dimensions.length; i++) {
            n *= dimensions[i];
        }

        float[] data = new float[n];
        H5.H5Dread(datasetId, HDF5Constants.H5T_NATIVE_FLOAT,
                        HDF5Constants.H5S_ALL, HDF5Constants.H5S_ALL,
                        HDF5Constants.H5P_DEFAULT, data);

        // now convert 1D array into 2D
        int rows = (int) dimensions[0];
        int cols = (int) dimensions[1];
        float[][] dest = new float[rows][];

        for (int i = 0; i < rows; i++) {
            dest[i] = new float[cols];
            System.arraycopy(data, cols * i, dest[i], 0, cols);
        }

        H5.H5Sclose(dataspaceId); // H5Sclose releases a dataspace.
        H5.H5Dclose(datasetId); // H5Dclose ends access to a dataset specified by dataset_id and releases resources used by it.

        return dest;
    }
pg_ctl: cannot be run as root
Please log in (using, e.g., "su") as the (unprivileged) user that will
own the server process.
Then I logged in as
sudo su -
but that also did not work. What worked was following:
☹  sudo su postgres

The default interactive shell is now zsh.
To update your account to use zsh, please run `chsh -s /bin/zsh`.
For more details, please visit https://support.apple.com/kb/HT208050.
bash-3.2$ /Library/PostgreSQL/14/bin/pg_ctl stop -D /Library/PostgreSQL/14/data
waiting for server to shut down.... done
server stopped
This shows the port is shutting down. After a while there is no output from the netstat command if you run it again. so this is how I was able to stop the server.
the difference between these two is nicely illustrated by below example:
test=# create table timestamp_test(t1 timestamp(0) without time zone, t2 timestamp(0) with time zone);
CREATE TABLE
test=# insert into timestamp_test values ('2011-01-01 00:00:00+03', '2011-01-01 00:00:00+03');
INSERT 0 1
test=# select * from timestamp_test;
         t1          |           t2
---------------------+------------------------
 2011-01-01 00:00:00 | 2010-12-31 13:00:00-08
(1 row)
What it means:
timestamp without time zone ignores any time zone offset specified when inserting data. So it doesn’t matter whether you are inserting '2011-01-01 00:00:00+03' or '2011-01-01 00:00:00-03'. For it, both are same and get truncated to '2011-01-01 00:00:00‘. And will return the inserted value as is when it is queried.
timestamp with time zone on the other hand takes into account the time zone offset when inserting data. It will convert the inserted value into UTC and store the epoch seconds as a bigint. When the data is queried, it will convert the UTC seconds to the time zone of the server and format the return value in that time zone. In above example we inserted ‘2011-01-01 00:00:00+03’ into the database. ‘2011-01-01 00:00:00+03’ means its ‘2011-01-01 00:00:00’ where I live and I am 3 hours ahead of GMT. So in GMT it is ‘2010-12-31 21:00:00’. And in PST which is 8 hours behind GMT (and the time zone of the server), it is ‘2010-12-31 13:00:00’ which is what it displays as 2010-12-31 13:00:00-08.
In a nutshell,
timestamp without time zone = I will be inserting timestamps without time zone timestamp with time zone = I will be inserting timestamps with time zone
This is how I believe the nomenclature originated. Ideally, Postgres should throw exception when user tries to insert a timestamp with time zone into a timestamp without time zone column but it doesn’t do that currently.
Which one should you use?
I honestly cannot think of a reason for using timestamp without time zone. This is because both take up 8 bytes so the cost is the same and timestamp with time zone takes into account time zone offsets.
If you are using timestamp without time zone make sure the timestamps you are inserting are in same time zone, otherwise you have a bug in your code.
TypeScript is a popular language these days and a hugely successful project as evidenced in latest SO Developer Survey. Another feather in the cap for Anders Hejlsberg for whom I have great respect.
I myself make my team use it for large-scale projects, however, every once in a while I wonder if its worth it. It creates hassle.
With raw JS, the code you write is the code that is run. No extra build step, no extra debug configuration in VS Code. Sometimes its hard to get VS Code debugger working with TypeScript. Not necessarily TypeScript’s fault but an issue is an issue.
Sometimes I have found it really gets in the way. More time is spent keeping TS happy than writing code. To strike a balance, the guideline I give to the team is to make sure the arguments and return value of every function is typed. Beyond that, they don’t need to use TS.
What do you think about TypeScript? Do you like it or not? Let me know in your comments.