If you want to run a custom build of the orderer, make sure you set the FABRIC_CFG_PATH and have an orderer.yaml inside FABRIC_CFG_PATH. The docker container will have it setup automatically for you. Copy the orderer.yaml from container to local machine using docker cp.
Install fabric from github under your $GOPATH/src/github.com/hyperledger
To build orderer simply run go build from the orderer folder. The orderer will require a few variables to be set before you can run it like CHANNEL_TX_FILE=./channel.tx GENESIS_BLOCK_FILE=./genesis.block ORDERER_GENERAL_GENESISFILE=./genesis.block ORDERER_GENERAL_LOCALMSPID=ordMSP ORDERER_GENERAL_LOCALMSPDIR=./msp.
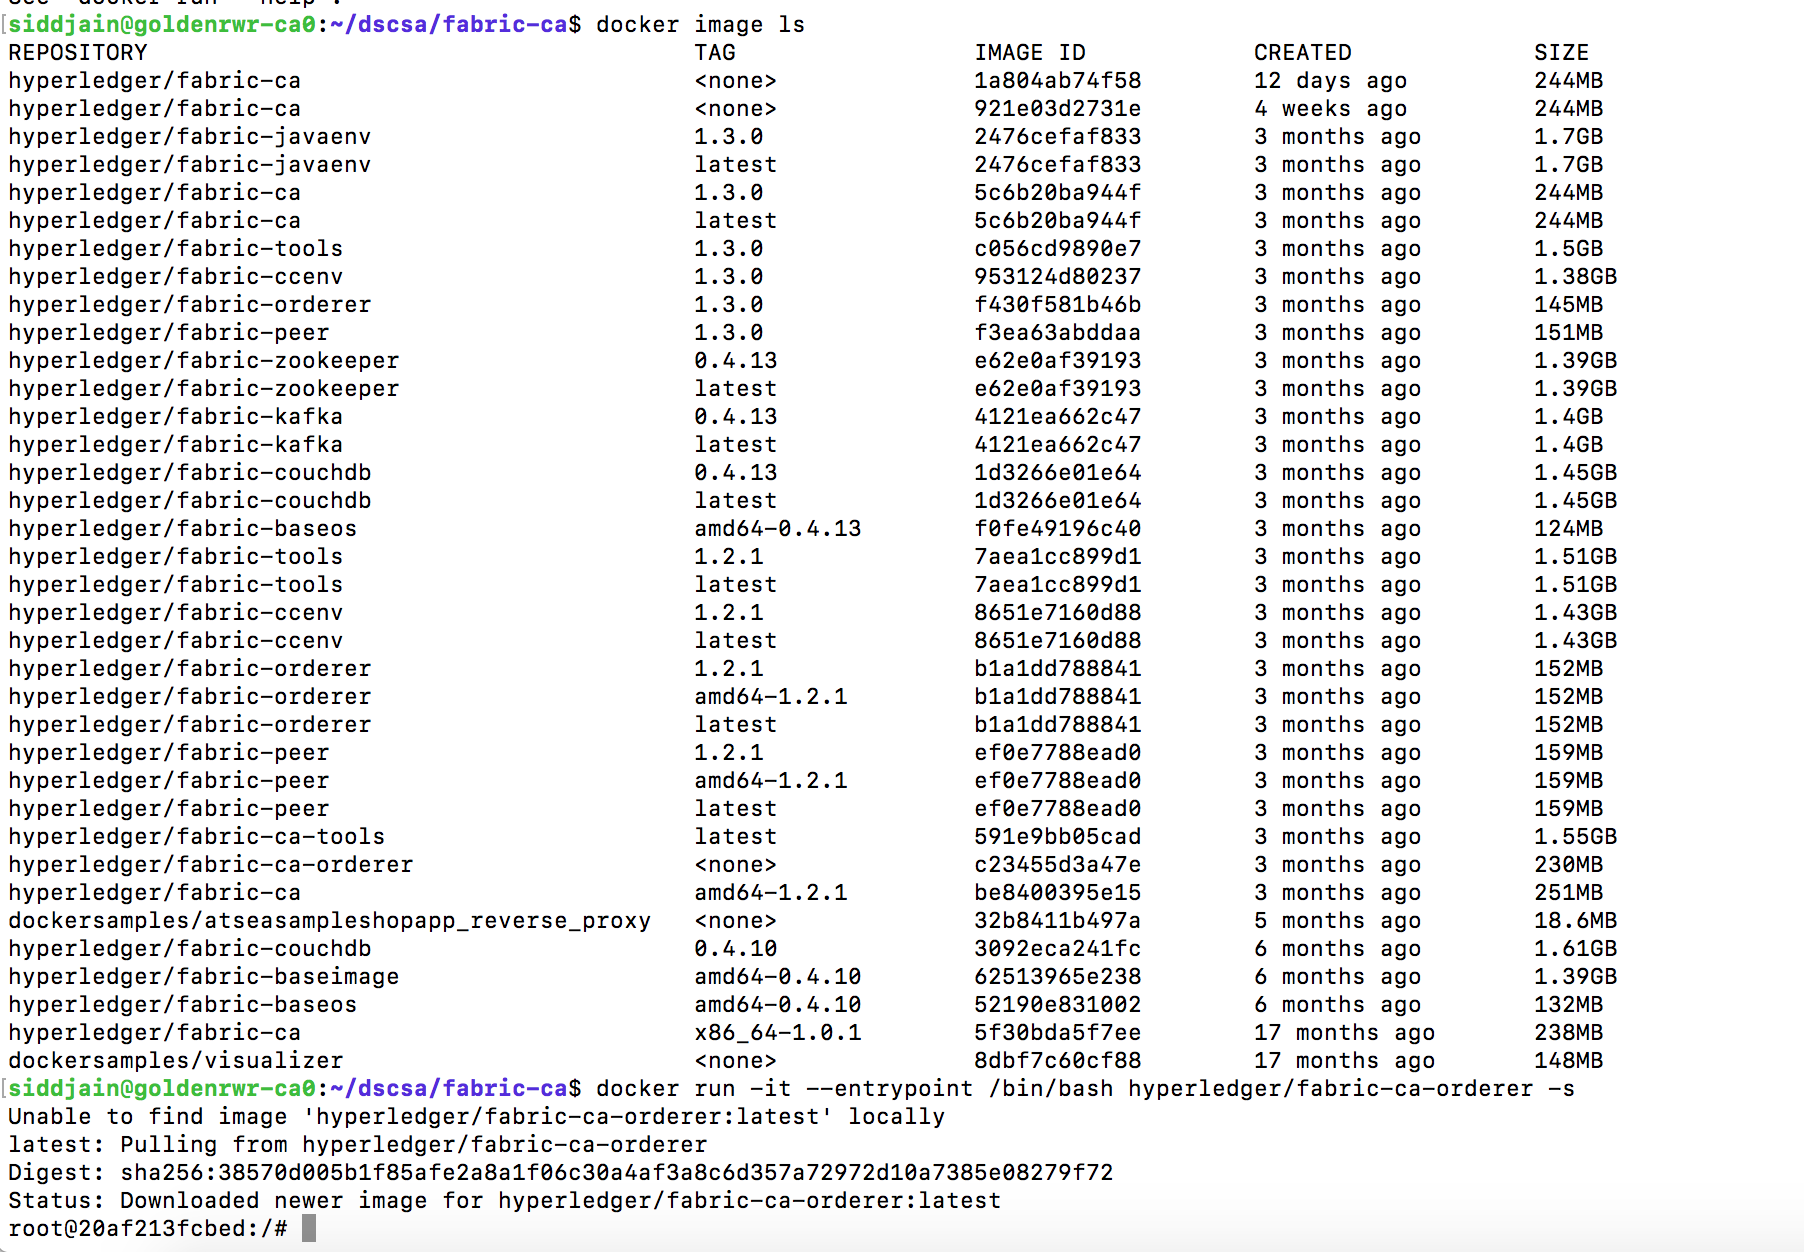
One handy command is docker inspect <image-name>. If we run it on fabric-ca-orderer, among other things it shows
Cmd contains the command the container will execute on starting. There is another field called Entrypoint which does the same thing. When both an ENTRYPOINT and CMD are specified, the CMD string(s) will be appended to the ENTRYPOINT in order to generate the container’s command string. More details at https://www.ctl.io/developers/blog/post/dockerfile-entrypoint-vs-cmd/
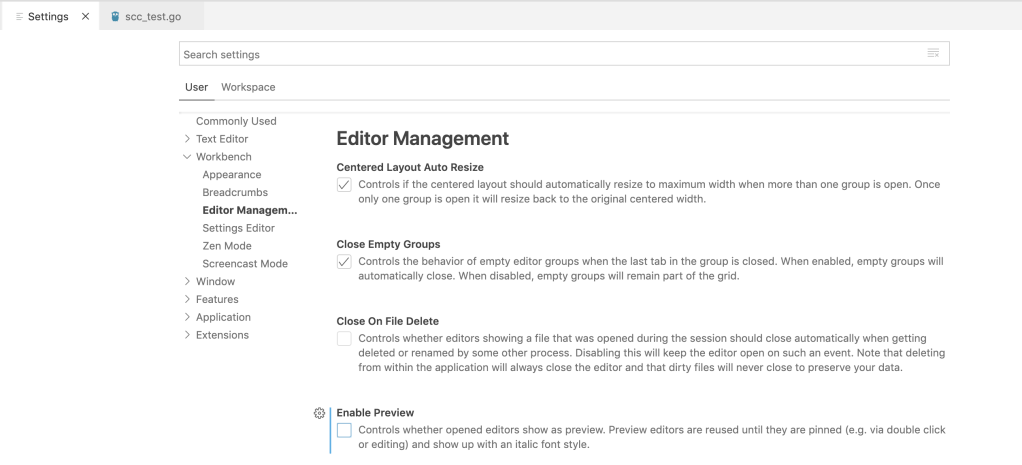
Open VS Code settings by clicking on gear icon at bottom left of VS Code
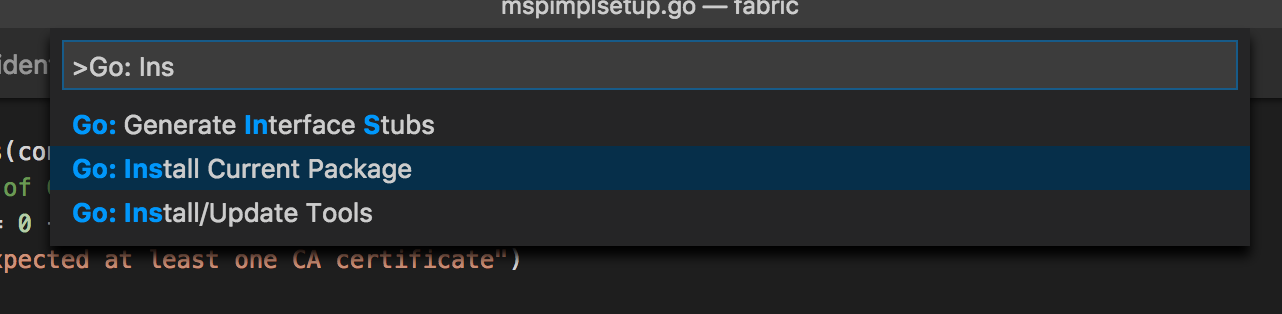
To Install/Update Go Tools View -> Command Palette (Cmd+Shift+P)
View -> Command Palette (Cmd+Shift+P)
To open a file quickly, Cmd+P
By default Cmd+P will open file in the current TAB and whatever file is currently open will be closed as a result. This is extremely annoying. Disable the Enable Preview checkbox to tell VS Code to open file in a new TAB.
TL;DR: If keyboard shortcuts don’t work as expected check if Karabiner Elements is causing the problem. N/A if you are not using Karabiner Elements.
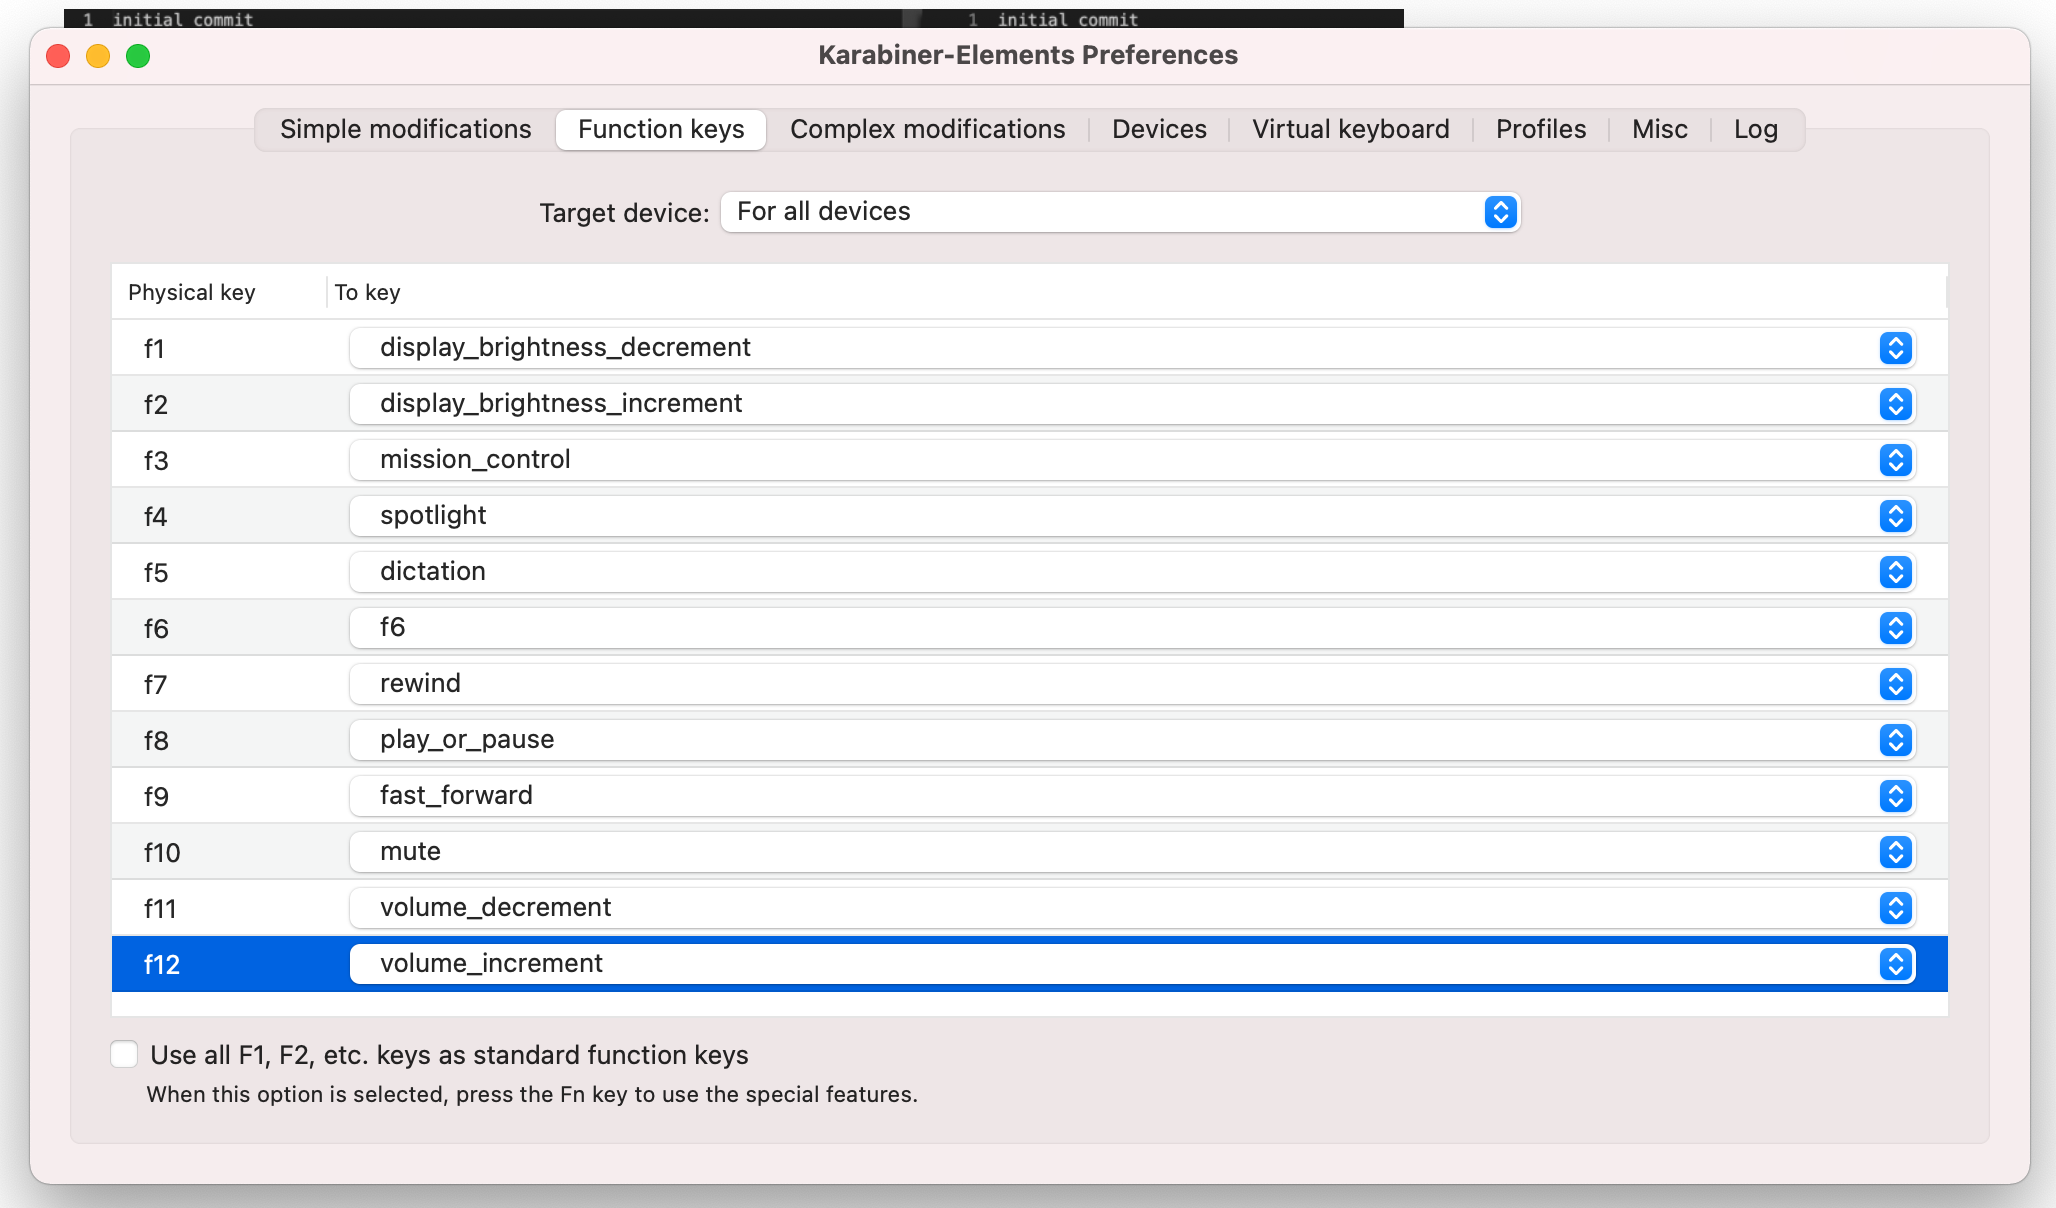
I ran into a problem when F12 was no longer taking me to definition. It was instead increasing the volume. Turns out the problem had to do with Karabiner Elements. In my Karabiner Elements I had following configuration:
The fix is simply to check the box that says Use all F1, F2, etc. keys as standard function keys.
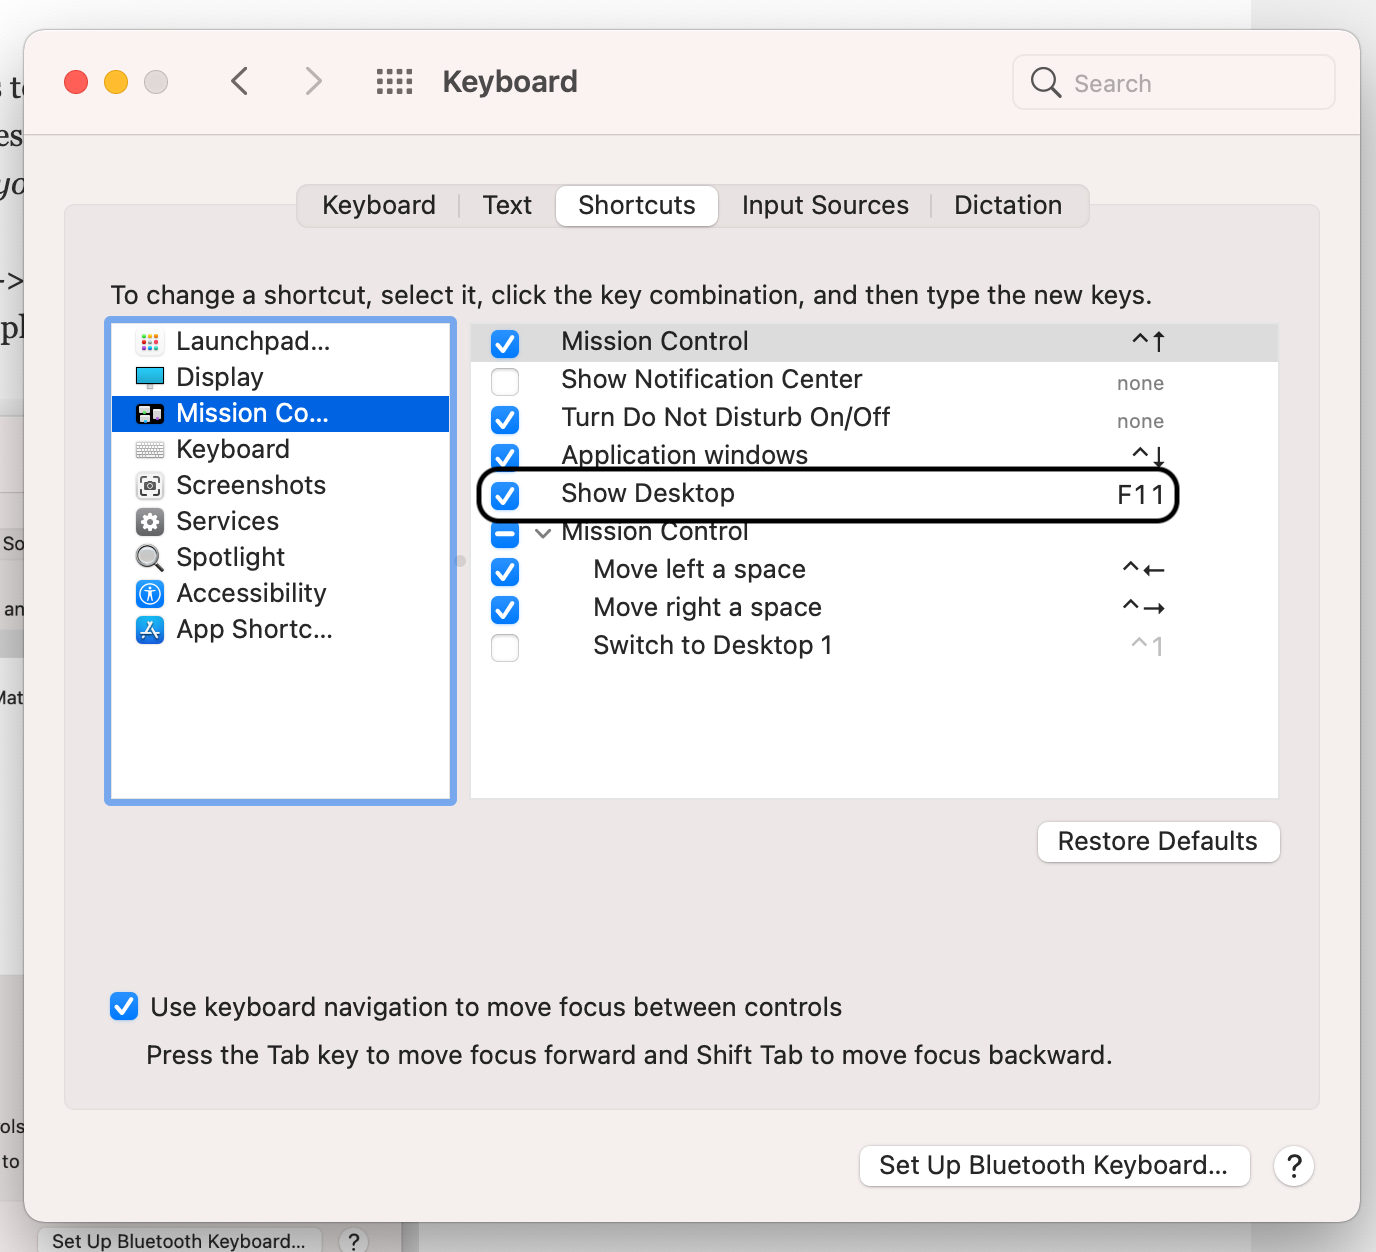
Another day I found F11 was not working as expected in VS Code. Its supposed to step inside a function while debugging. The culprit was the setting in System Preferences -> Keyboard -> Shortcuts -> Mission Control which was causing F11 to show the desktop.
After unchecking the box F11 started working in VS Code.
In launch.json here is how you specify environment variables (env), program arguments (args) and arguments to JVM (vmArgs) and additional dependencies to the classpath besides those in pom.xml:
Error: Build path specifies execution environment JavaSE-10. There are no JREs installed in the workspace that are strictly compatible. edit pom.xml and add <java.version> in that. After that do not forget to clean Java language server workspace (Cmd+Shift+P -> Java: clean) and restart vs code.
Shift+Alt+O will add required imports and also remove unused imports. Alt is also known as Option key.
Shift+Alt+F will format the file. You can open Settings and turn on Format on Save. this way VS Code will auto-format the code when its saved.
Frequently when you try to debug (F5) you will get an error complaining the build failed even though there is nothing wrong with the code and you can execute it from the command line. VS Code also asks do you want to proceed even if the build failed. Error occurred while building workspace. The solution is to clean the workspace directory. See this.
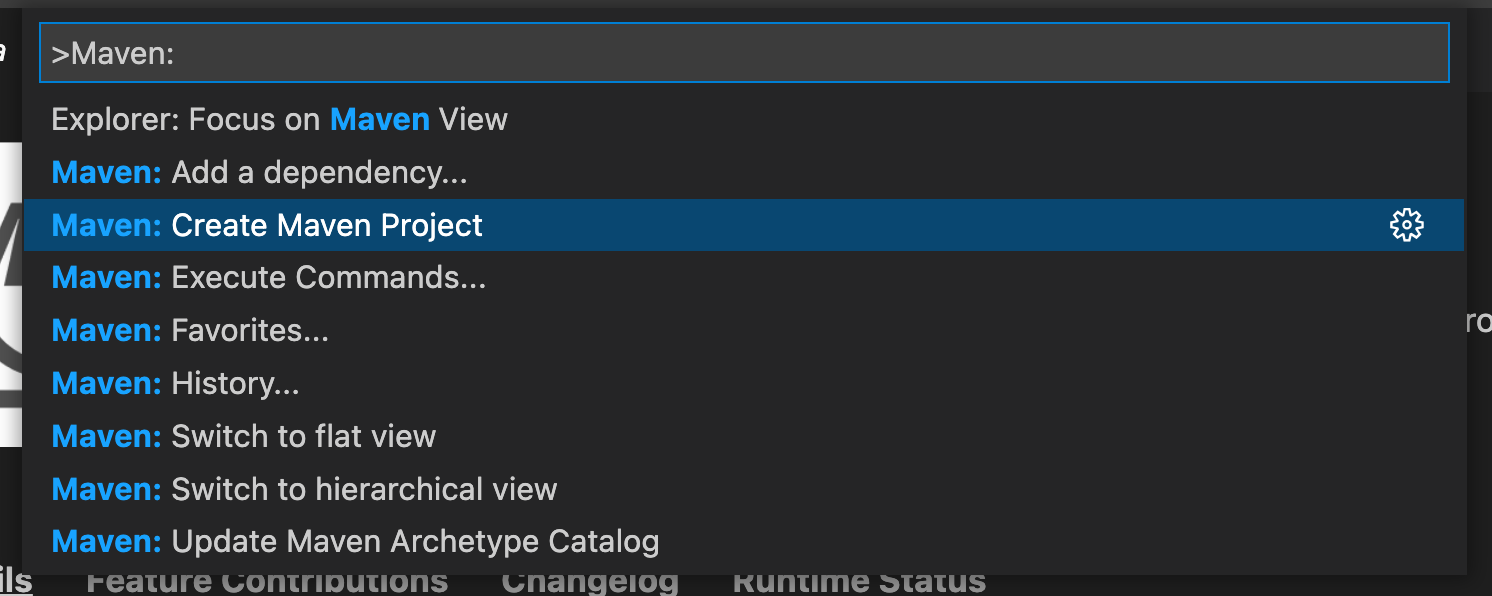
To create a new project use Cmd+Shift+P: Maven: Create Maven project.
As of this writing the generated pom.xml does not contain <java.version>. Add it as best practice as shown below. I have also changed JDK version to 11.
The Maven extension executes Maven by opening a terminal session and then calling Maven in that session. Maven requires the JAVA_HOME environment variable to be set. Maven will also look for other variables such as MAVEN_OPTS. If you prefer not to set those variables permanently you can configure them, or any other environment variable, in settings:
{
    "maven.terminal.customEnv": [
        {
            "environmentVariable": "MAVEN_OPTS",               // variable name
            "value": "-Xms1024m -Xmx4096m"                     // value
        },
        {
            "environmentVariable": "JAVA_HOME",                // variable name
            "value": "C:\\Program Files\\Java\\jdk-9.0.4"      // value
        }
    ]
}
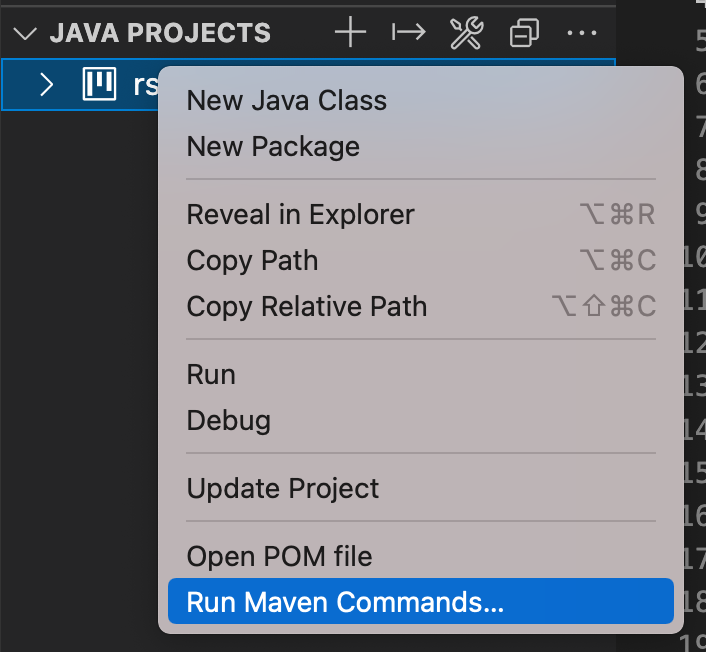
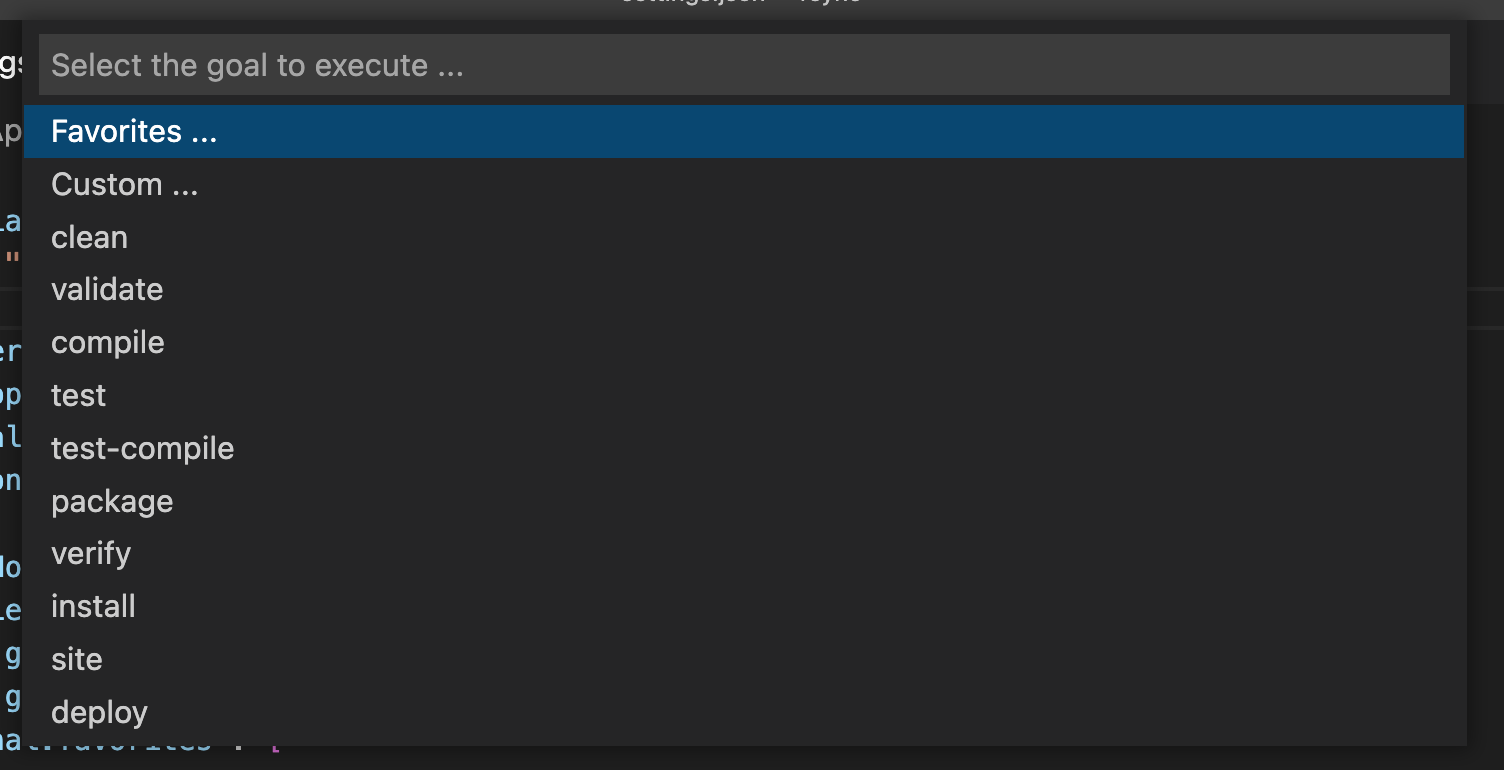
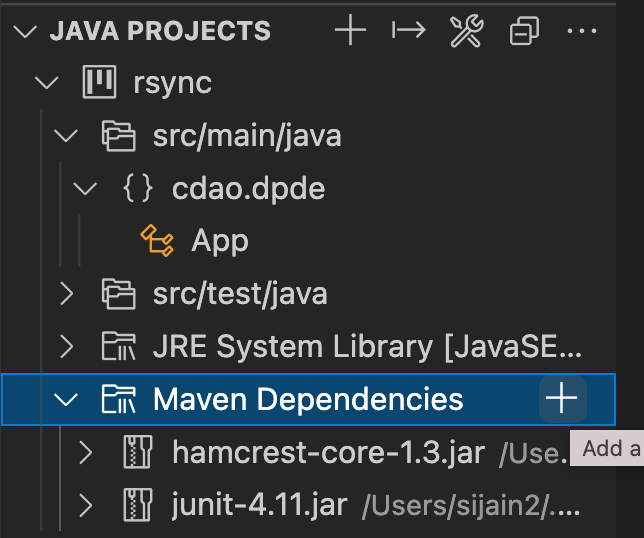
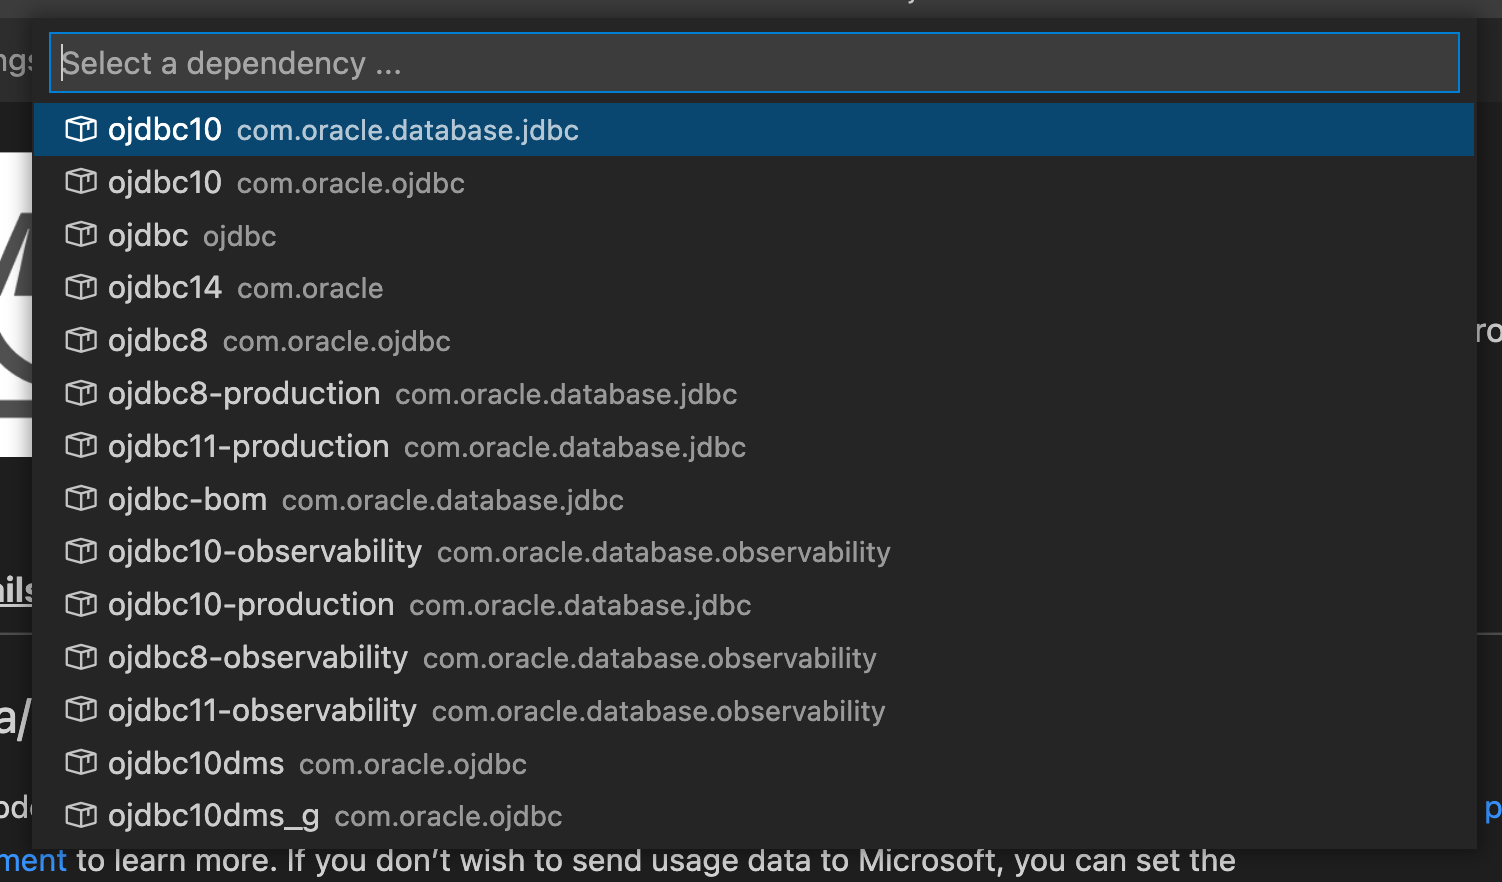
To find a library goto mvnrepository.com. once the library is found there:
this will add dependency to pom.xml
Another useful shortcut is Source Action... to automatically generate constructors and getters / setters. Watch the videos here.
You can add additional dependencies to your classpath in addition to those in pom.xml by editing launch.json like so:
$Auto adds all dependencies defined in pom.xml. Refer this. Warning: Using environment variables (e.g., using $HOME instead of /Users/me) in the classpath did not work for me. See this.
Note that VS Code does not use the javac compiler to compile your code. Instead it uses a compiler that ships with Eclipse JDT (java development tools). more on it here.
VSCode Python Tips (Problems and Solutions)
Not able to step into the code of a library or stick breakpoints in library code
Make sure that justMyCode is set to false in launch.json. Example:
After 1 year of intense coding, VS Code accumulated 4GB of data. don’t know what is essential and what is junk:
>>> du -sh ~/Library/Application\ Support/Code/                                                                                                                                                                                                 15:25.12 Wed May 15 2024 >>>
4.3G	/Users/xxx/Library/Application Support/Code/
3GB is in
>>> du -sh ~/Library/Application\ Support/Code/User/workspaceStorage                                                                                                                                                                            15:25.41 Wed May 15 2024 >>>
2.9G	/Users/xxx/Library/Application Support/Code/User/workspaceStorage
it seems that this folder can be deleted [1]. Also you can delete ~/Library/Application\ Support/Code/CachedData and ~/Library/Application\ Support/Code/Cache folders. After deleting these folders the size went down to less than a GB.
I was very excited to work with Hyperledger when I first did a comparison between Ethereum vs. Hyperledger [1]. The ability to write chaincode in javascript was especially appealing to me. However after more than a month of spending time in the trenches and doing Hyperledger Fabric development, my opinions changed. If I were to revisit Part I of Ethereum vs. Hyperledger [1], I would add one more row to the table as follows:
Ethereum
Hyperledger
Developer Experience
–
F
I haven’t done any programming with Ethereum so don’t know how developer friendly it is but can safely say that Hyperledger scores an F on the developer experience. Lets try to break down the developer experience on following competencies:
Works without any issues
SDK provides good, exhaustive and bug-free code samples showing how to write code and exercise functionality
Comprehensive and accurate documentation
Tech Support: When there is an issue, there is a helpful community to provide support
Rating Scale.
A – excellent. Scores +1 on all dimensions above B – Good. Better than other alternatives out there C – Fair. comparable to other alternative platforms D – Poor. there exist better alternatives out there F – Fail. -1 on all of the above dimensions
everywhere in the samples they keep on using cryptogen and then write that cryptogen should not be used in production.
In all the samples, the private crypto keys are blatantly exposed [example] and there is no sample showing how to protect them in a prod environment.
All the samples create a network in which all the nodes are running on the same computer. There is no sample showing how to create a real-world network spanning multiple computers
the list goes on. Basically there is no sample showing how to write a production quality app
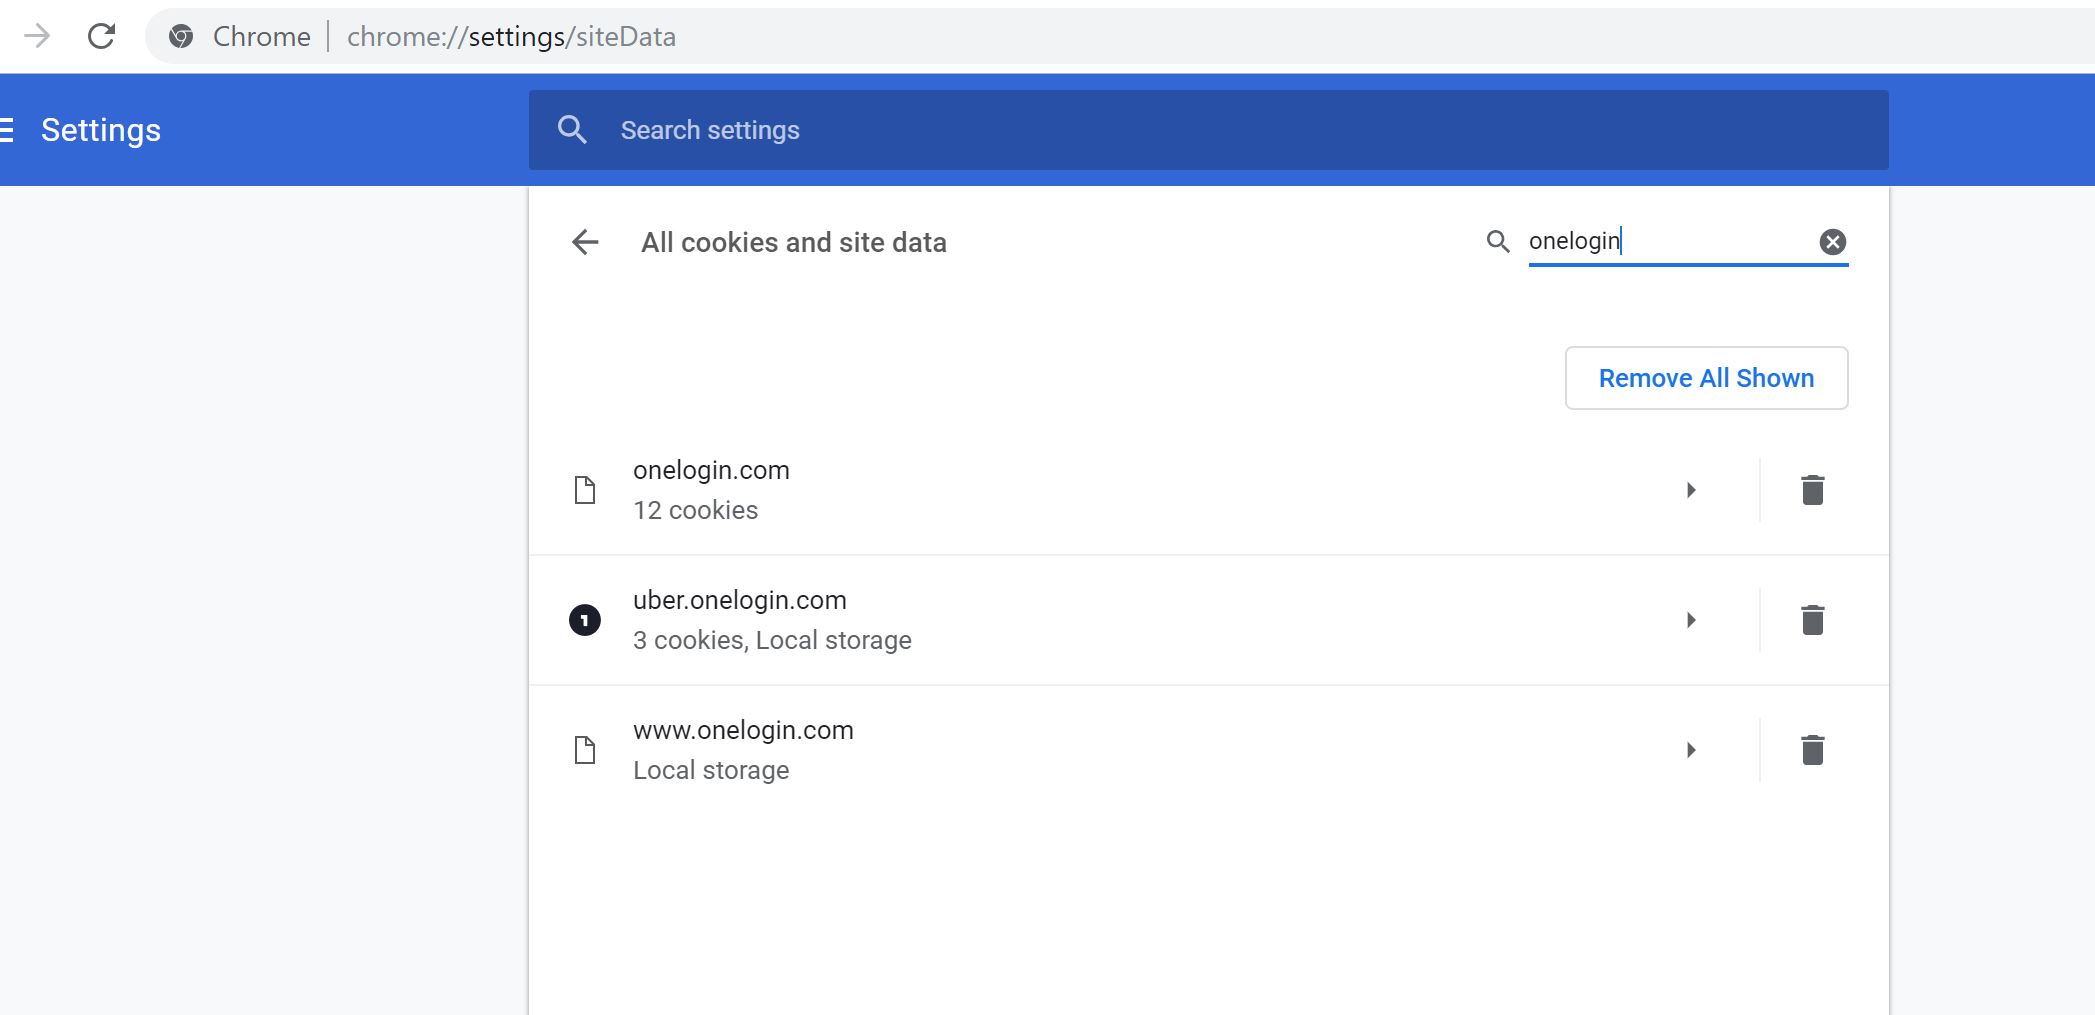
Incorrect documentation: Worse than missing documentation is incorrect documentation and Fabric is full of it. e.g., instructions on https://github.com/hyperledger/fabric-samples/tree/release-1.3/balance-transfer/typescript say that Node.js v6.9.0 – 6.10.0 ( Node v7+ is not supported ) is required whereas the instructions elsewhere say that Node.js v8.4.0 or higher. Even the HL Fabric prerequisites say that If you will be developing applications for Hyperledger Fabric leveraging the Hyperledger Fabric SDK for Node.js, you will need to have version 8.9.x of Node.js installed. I kept a screenshot of the incorrect documentation here in case it gets fixed later. This e.g., caused me lot of trouble and wasted time. As I found out thae hard way, in reality Node.js v6.9.0-6.10.0 will land you in trouble. This is because Promises were introduced only in version 8 of Node.
Another example of incorrect documentation is here on this line let key = enrollment.key.toBytes();
I preserved a screenshot here. In reality the key needs to be a string and if you use a byte array, there will be an error.
Missing Documentation: Hyperledger Fabric relies on a dozen configuration files. Some of them are listed below:
configtx.yaml
orderer.yaml
fabric-ca-server-config.yaml
fabric-ca-client-config.yaml
core.yaml
peer.yaml
nowhere can one find explanation of all the fields in these yaml files. More examples showing the sad state of documentation, various bugs and incomplete features [1, 2, 3,4, 5, 6]
Some things that are unrelated to developer experience but worth mentioning (identifying open gaps):
No support for kubernetes [ref]. Running HL Fabric on Kubernetes requires that you provide privileged access in order to run the chaincode. There are also some other issues as well. As a result, running HLF on kubernetes and thus OpenShift, is not recommended for production.
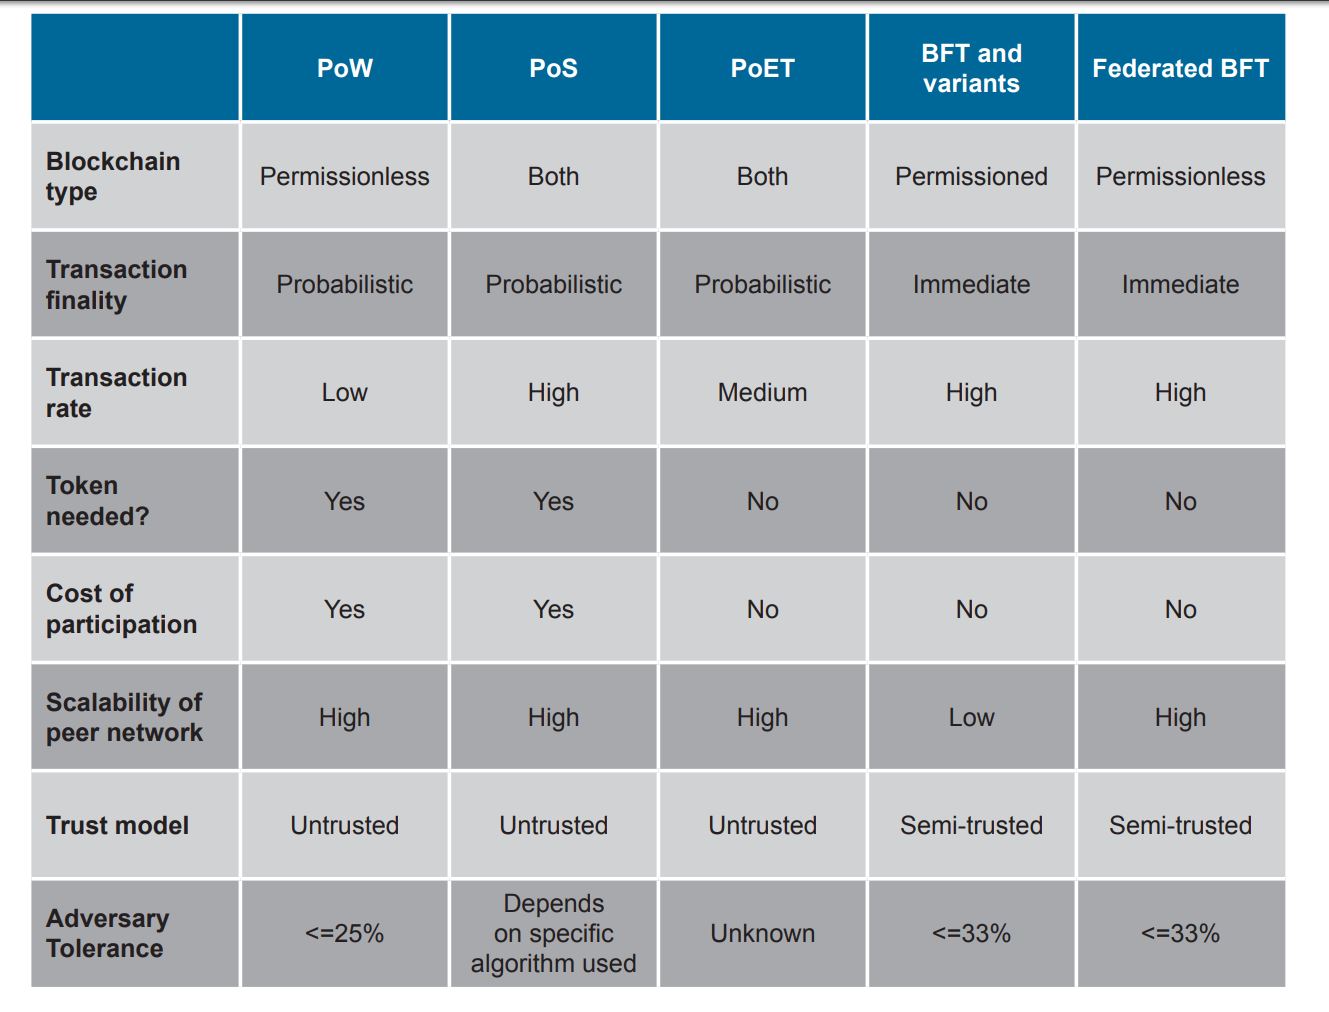
I am also not sure if Hyperledger Fabric really comes with a true consensus protocol [1]
And it seems to come with a some security loopholes [ref]. Essentially in order to run fabric, you have to allow peer nodes access to the the docker daemon which they need in order to spin up a new container to run the chaincode; but giving this access is risky as illustrated in [ref]. That is why there is no support for kubernetes.
A list of questions I have asked on fabric DL. And on SO. Bugs I have filed against Fabric.
Conclusion: If you haven’t already made lot of investment in Hyperledger Fabric, it is best to stay away from it.
Ethereum uses a PoW consensus which is expensive whereas HL uses Apache Kafka to order the transactions and a customizable endorsement policy to drive consensus. Fabric claims its consensus protocol can be changed and customized.
Ethereum uses order-execute architecture which requires all peers to execute every transaction whereas HL uses execute-order-validate architecture
Ethereum can process 25 transactions per sec [1] whereas HL Fabric can process 3500 TPS [2]
The experimental results, based on varying number of transactions, show that Hyperledger Fabric consistently outperforms Ethereum across all evaluation metrics which are execution time, latency and throughput. [3]. Also see [4] for more independent tests confirming the same
Ability to write chaincode in familiar languages: Ethereum smart contracts have to be written in Solidity language. HL Fabric chaincode can be written in Go, NodeJS or Java
Transactions can be non-deterministic: this is the reason why Ethereum does not support writing smart contract in a general purpose programming language
Support for private data: HL provides support for private data using channels and side-db. In Ethereum there are no means to issue a private transaction between members [3].
Enterprise Footprint: This is the most important factor that should be used to guide which platform to choose. Many big and reputed enterprises have deployed HL Fabric based blockchain solutions e.g.: walmart, tradelens, hu-manity.co, AID:Tech, MedicalChain. I am not aware of any enterprise blockchain based on Ethereum (although I have not done exhaustive research here; also see this). JPMorgan has taken a fork of Ethereum and developed a new offering known as Quorum. there are enterprise apps built on Quorum. But Quorum is not Ethereum.
Cryptocurrency not needed: Ethereum requires use of a cryptocurrency known as Ether. HL Fabric has no concept of a cryptocurrency as it is N/A for enterprise apps.
Membership Service Provider: A MSP is what enables creation of a permissioned blockchain. Ethereum does not some with any MSP.
It is possible that Ethereum team will work to address the issues above so that its used in enterprise (see this). But in the meantime there is no reason not to use a platform that was specifically built for business.
If an identity that is not registered is tried to enroll, the enrollment will fail with following message on the fabric-ca server: “Failed to get user: : scode: 404, code: 63, msg: Failed to get User: sql: no rows in result set”. This gives us a clue as to what registration really does
fabric-ca-client assumes the identity of whatever is in $FABRIC_CA_HOME/msp by default. This can be changed by using the -M flag in command line args to fabric-ca-client. If there is no identity stored in the mspdir directory you will get below error no matter what command you try to execute with fabric-ca-client (except the enroll command in which case the directory should be empty). more info at https://stackoverflow.com/a/55249822/147530:
[ERROR] Enrollment check failed: Idemix enrollment information does not exist
by default FABRIC_CA_HOME is set to /etc/hyperledger/fabric-ca-server
If TLS is enabled then:
we need to connect using https not http
we need to pass –tls.certfiles X to fabric-ca-client where X = the cert of the CA who issued cert to the server
When I read hyperledger docs and specifically the section on Enrolling Bootstrap Identity, I noticed it does not register a user before enrolling. This led me to think that a user can be enrolled without registering but that is not true. If one tries to enroll a user who has not been registered, the request will fail with following error message in fabric-ca server logs:
"Failed to get user: : scode: 404, code: 63, msg: Failed to get User: sql: no rows in result set"
So how come the bootstrap identity can be enrolled without registering? The answer is that when enrolling the bootstrap identity, the username and password must match the username and password given when fabric-ca-server was started. When the server is started, it automatically registers an identity with given username and password i.e., it stores a row in sql database with given username and password – that is what registration is about. When fabric-ca-client tries to enroll a user the server will check the sql database to first verify that the user exists and fail with above message otherwise. So all users except the bootstrap identity need to be registered first before enrolling.
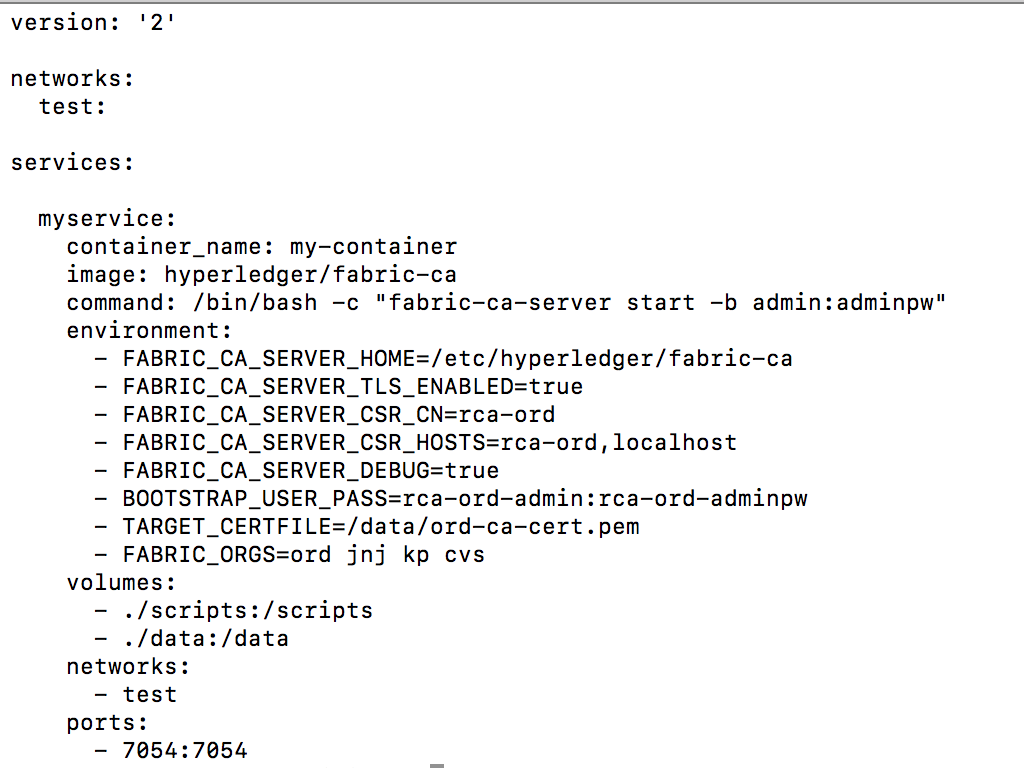
we illustrate this below with some actual commands. Create a docker-compose.yaml file with following contents:
now run it
$ docker-compose up
It should spin up a docker container named my-container. Log into the container:
$ docker exec -it my-container /bin/bash
since we have enabled TLS we need to connect using https instead of http. Also we need to add localhost to FABRIC_CA_SERVER_CSR_HOSTS otherwise will get an error saying
x509: certificate is valid for rca-ord, not localhost
Error: Failed to get client TLS config: No trusted root certificates for TLS were provided
what happened? we enabled TLS. so when the client tried to connect to the server, the server give it a cert but the client cannot verify authenticity of the certificate. The client needs to have the CA that issued cert to server in its trusted CA list. So to fix it run:
on server:
my-container | 2018/12/28 17:32:28 [INFO] 127.0.0.1:58882 POST /enroll 401 23 "Failed to get user: : scode: 404, code: 63, msg: Failed to get User: sql: no rows in result set"
this is because user is not registered.
root@1e046d83410d:/# fabric-ca-client enroll -u https://admin:adminpw@localhost:7054 --tls.certfiles $FABRIC_CA_SERVER_HOME/tls-cert.pem
2018/12/28 17:25:38 [INFO] TLS Enabled
2018/12/28 17:25:38 [INFO] generating key: &{A:ecdsa S:256}
2018/12/28 17:25:38 [INFO] encoded CSR
2018/12/28 17:25:38 [INFO] Stored client certificate at /etc/hyperledger/fabric-ca-server/msp/signcerts/cert.pem
2018/12/28 17:25:38 [INFO] Stored root CA certificate at /etc/hyperledger/fabric-ca-server/msp/cacerts/localhost-7054.pem
2018/12/28 17:25:38 [INFO] Stored Issuer public key at /etc/hyperledger/fabric-ca-server/msp/IssuerPublicKey
2018/12/28 17:25:38 [INFO] Stored Issuer revocation public key at /etc/hyperledger/fabric-ca-server/msp/IssuerRevocationPublicKey
note we gave same username and password as the one used when starting the server. This is what defines the bootstrap identity – it is the user who started the server. And the command succeeds now. we can look at the cert of bootstrap identity as follows:
my-container | 2018/12/28 17:36:03 [INFO] 127.0.0.1:58884 POST /enroll 401 23 "Failed to get user: : scode: 404, code: 63, msg: Failed to get User: sql: no rows in result set"
Note that we enrolled bootstrap user earlier and above command ran under its identity. the fabric-ca-client will take identity from $FABRIC_CA_HOME/msp
Since we did not specify any password the server generated one for us
Example showing password set at time of registration:
Returned back from vacation to find this error when I try to run hyperledger fabric sample. It used to work just fine before I left on vacation. What gives?
WITSC02X6385JGH:fabric-ca sjain68$ docker logs -f dev-peer1-jnj-mycc-1.0> chaincode@1.0.0 start /usr/local/src> node chaincode.js "--peer.address" "peer1-jnj:7052"E1219 23:48:19.15939138919 ssl_transport_security.cc:238] Could not get common name of subject from certificate.{ fcn: 'create', params: [ '00000' ] }SyntaxError: Unexpected tokenin JSON at position 0at JSON.parse ()at new ClientIdentity (/usr/local/src/node_modules/fabric-shim/lib/chaincode.js:246:27)at Chaincode.Invoke (/usr/local/src/chaincode.js:29:17)
Turns out there is some problem with v0.3.4 of X509 library that was released recently. Change dependencies to use 1.3.2 of fabric-shim and error should go away. 1.3.2 locks x509 version to 0.3.3. Writing this post to remind myself that the same code I wrote today may not work tomorrow. When that happens its usually a dependency problem – someone pulled the carpet from below my feet. So its better to always lock the versions of dependencies.
SyntaxError: Unexpected tokenin JSON at position 0at JSON.parse ()at new ClientIdentity (/usr/local/src/node_modules/fabric-shim/lib/chaincode.js:246:27)at Chaincode.Invoke (/usr/local/src/chaincode.js:29:17)
The E1219 23:48:19.159391389 19 ssl_transport_security.cc:238] Could not get common name of subject from certificate happens with any chaincode. It happens when following command is run:
Where to book? Book flights + hotel + car at costcotravel.com
Total days needed? 7 (1 day to fly in and 1 day to fly back)
Where to stay? for 3 star recommend Napili Surf Beach Resort. For 4-5 star recommend Hyatt Regency or another 4 star property along Kaanapali Beach (Westin, Marriot, Sheraton etc.)
Where not to stay? Napili Shores by Outrigger. Not a disaster but Napili Surf Beach Resort is right next to it and more updated with same price.
What car to rent? Full size car like Hyundai Sonata. We had 4 pieces of baggage (3 carry-on sized, 1 bigger), 2 bagpacks, 1 stroller, 1 carseat for baby and it fit in the Sonata. There is Costco Gas near airport to fill up the tank before returning the car.
Where to rent beach gear? Boss Frog. They have locations all over Maui including Napili, Lahaina, Kihei. You can drop off your gear at any of their locations, not necessarily the one from where you picked it up.
Where to buy groceries? You can buy some on the day you land at the Costco near the airport. On other days there is a good grocery store called Napili Market in the nearby Napili Plaza if you are staying at the Napili Surf Beach Resort. There is also a Safeway in Lahaina.
Day 1 – Lahaina, Front St. Beware of many shops selling discount tickets to helicopter tours and other activities. They will require you to attend some seminar where they will try to sell you some condo or property in Hawaii. Just stay clear of them. Be prepared to pay $7/hr parking.
Day 2 – Maui Ocean Center and adjacent Harbor Shops at Maalaea Harbor. Eat at Seascape and coffee at Hula Cookies in Harbor Shops. You can buy ocean center tickets online at viator.com to get some discount.
Day 3 – Snorkel at Molokini Island. Book at Blue Water Rafting. Rent a wet suit from Boss Frog before going to snorkel. Blue Water Rafting will not provide any wet suit. Eat at Choice Health Bar in Lahaina. Have coffee on the way back at the Coffee Store in Napili Plaza.
Day 4 – Helicopter tour of Hana Rainforest. Book at Maverick Helicopters. I think Maverick is the only operator who does a landing at the Hana Rainforest so you can explore it on foot. Eat at AA Roots in Napili Plaza.
Day 5 – Boogie boarding at the beach. Check out Whaler’s Village and while there buy some cookies at Honolulu Cookies (ask them to validate parking) and spend evening watching Drums of the Pacific Maui at Hyatt Regency. Take some warm jacket as it will get about 10-12 degrees cooler in the night and you might want to have it. Hyatt Regency has valet parking for $5 which is worth it IMO.
Total Distance Covered by car: 300 miles
Further Notes:
Be prepared for strong winds.
You may rent a beach package from Maui Vacation Equipment including a Coleman tent, baby toys, a cooler and 2 Tommy Bahama Chairs for one week. You pay them in advance and they deliver the gear to your room before you check in at the hotel. They also pick it up and the delivery is included in the price. We did so but didn’t end up using it so YMMV (your mileage may vary).
A new macbook pro comes installed with bash version 3. I needed to install bash 4 to be able to use the bash debug vs code extension. To do this run
brew install bash
once its done you will need to edit /etc/shells file so that it looks like following:
WITSC02X6385JGH:temp sjain68$ cat /etc/shells# List of acceptable shells for chpass(1).# Ftpd will not allow users to connect who are not using# one of these shells.# 4.x of bash/usr/local/bin/bash# 3.x of bash/bin/bash/bin/csh/bin/ksh/bin/sh/bin/tcsh/bin/zsh