
- The order of dependencies in
pom.xmlcan matter because when there are multiple versions of a dependency in the dependency tree, the nearest one wins and when there are multiple nearest ones, the first declaration wins. See this SO answer. Best Practice: Don’t rely on the order of dependencies to resolve a version. UsedependencyManagementsection inpom.xmlto directly specify the versions of artifacts to be used when they are encountered in transitive dependencies or in dependencies where no version has been specified. - Understand dependency scopes. When you read compilation, test and runtime in the official documentation, make a mental substitution with
mvn compile,mvn testandmvn execcommands respectively. I found that to be helpful. There are 6 scopes defined out of which 1 is deprecated (system) and I haven’t used 2 in my work (runtimeandimport). That leavescompile,testandprovidedwhich are the 3 scopes you are most likely to use and they correspond todependencies,devDependenciesandpeerDependenciesof Node.js. In my own words:Compile: Easiest to understand and works the way you would expect. This dependency will be available at compile time (i.e., when runningmvn compileormvn package) and also runtime. Note that runtime means when executing your project withmvn execplugin. If you are executing viajavacommand then you are responsible for declaring the full classpath and much of the discussion doesn’t apply. Also Maven will import the dependencies of acompiledependency during build and run.Test: The dependency is available during compile and during testing (mvn test). However, it is not added to the classpath when you runmvn exec. This scope is intended to be used for dependencies likejunitthat you need while testing but are not part of your main application.Provided: This is the one which is difficult to understand and causes issues likeClassNotFoundException. If you are familiar with Node.js,providedis just likepeerDependenciesof Node.js. The (only) use-case I am familiar with is when you are developing libraries, modules or plugins which are expected to be imported by other projects i.e., your project is not the final executable. You will never runmvn execon your project. Having aprovideddependency in yourpom.xmland runningmvn execon your project is a sure way to generate aClassNotFoundException. The project that imports your project in itspom.xmlshould also import your project’sprovideddependencies (e.g., if A is declared asprovidedin yourpom.xml, then the project that imports your project should import A with scopecompile). Then, whenmvn execis run on that project everything will work. Any dependency declared asprovidedis available to you at compile time (and even test) so that your code compiles (and you can test it) but it won’t be included if you runmvn execor in the packaged jar when you runmvn package. Note that evencompiledependencies by default are not included in a jar file. We have to create a fat-jar using special plugins (Maven Shade or Maven Assembly plugin) and they will skip overprovideddependencies.Runtime: Say your project contains code that calls classes and methods from A. Then you definitely need A during the compile phase of your program otherwise code won’t compile. Now let’s say A calls methods from B but your project never directly calls classes or methods from B. Thus your project has an indirect dependency on B. You don’t necessarily need B to be added to the classpath when compiling your code (i.e,mvn compile). But you will need B to be available when running your program. In this case, you could add a reference to B inpom.xmland mark it withruntimescope. Or as most of us do, why bother? Maven includes a dependency withruntimescope in the runtime and test classpaths, but not the compile classpath.
System: Deprecated but still used. The use-case for this that I am most familiar with is to be able to reference a jar that you downloaded from somewhere (such as GitHub for example). The dependency is not available (published) on Maven Central or another repo. In that casesystemallows one to specify the local file path to the assembly. A better alternative is to download the file and then runmvn install:install-file(see full command here) to install it into local Maven repository and then reference it just like any other dependency withcompilescope.Import: I have never used this one.
- When things aren’t working as expected w.r.t. dependencies look at the source code. Exec plugin source code is here. And the code for core Maven which does dependency resolution is here. Look at the methods
getCompileClasspathElements(),getTestClasspathElements(),getRuntimeClasspathElements()here to see the dependency scopes in action. The code is the ultimate documentation. - Become familiar with
mvn dependency:tree,mvn dependency:analyze,mvn dependency:listand much more. See this for full list. These will help debugging dependency issues. - When there are multiple versions of a dependency in your dependency tree, only one will end up being actually used. This is what we mean by dependency resolution. Most of the time things will work but sometimes your project has reference to A and B and A must use a different version of C than B (i.e., both A and B depend on C but must use different versions of C). When this happens you will get runtime errors because only one version of C will ultimately end up in the classpath and either A or B will break. To fix this, use the Shade plugin which will basically rename all the classes in an assembly to something else. Think of it as if you had clicked on refactor and rename class in VS Code. This allows the different versions of C to co-exist in your final jar.
- See Maven lifecycles.
- To get the complete classpath (path to all the dependency jars your project uses) run
mvn dependency:build-classpath. You can then use this classpath as argument to-cpflag ofjavacommand. - To install a dependency from maven central to your M2 repository run (as example):
mvn dependency:get -DremoteRepositories=https://mvnrepository.com/ -Dartifact=com.oracle.database.jdbc:ojdbc10:19.15.0.0.1 - The
M2_HOMEvariable is deprecated and no longer used by recent Maven versions. If you want to set the path of Maven repository, the correct way to do it is to edit/path/to/maven/conf/settings.xmle.g., as:
<localRepository>/your/custom/path/.m2/repository</localRepository>
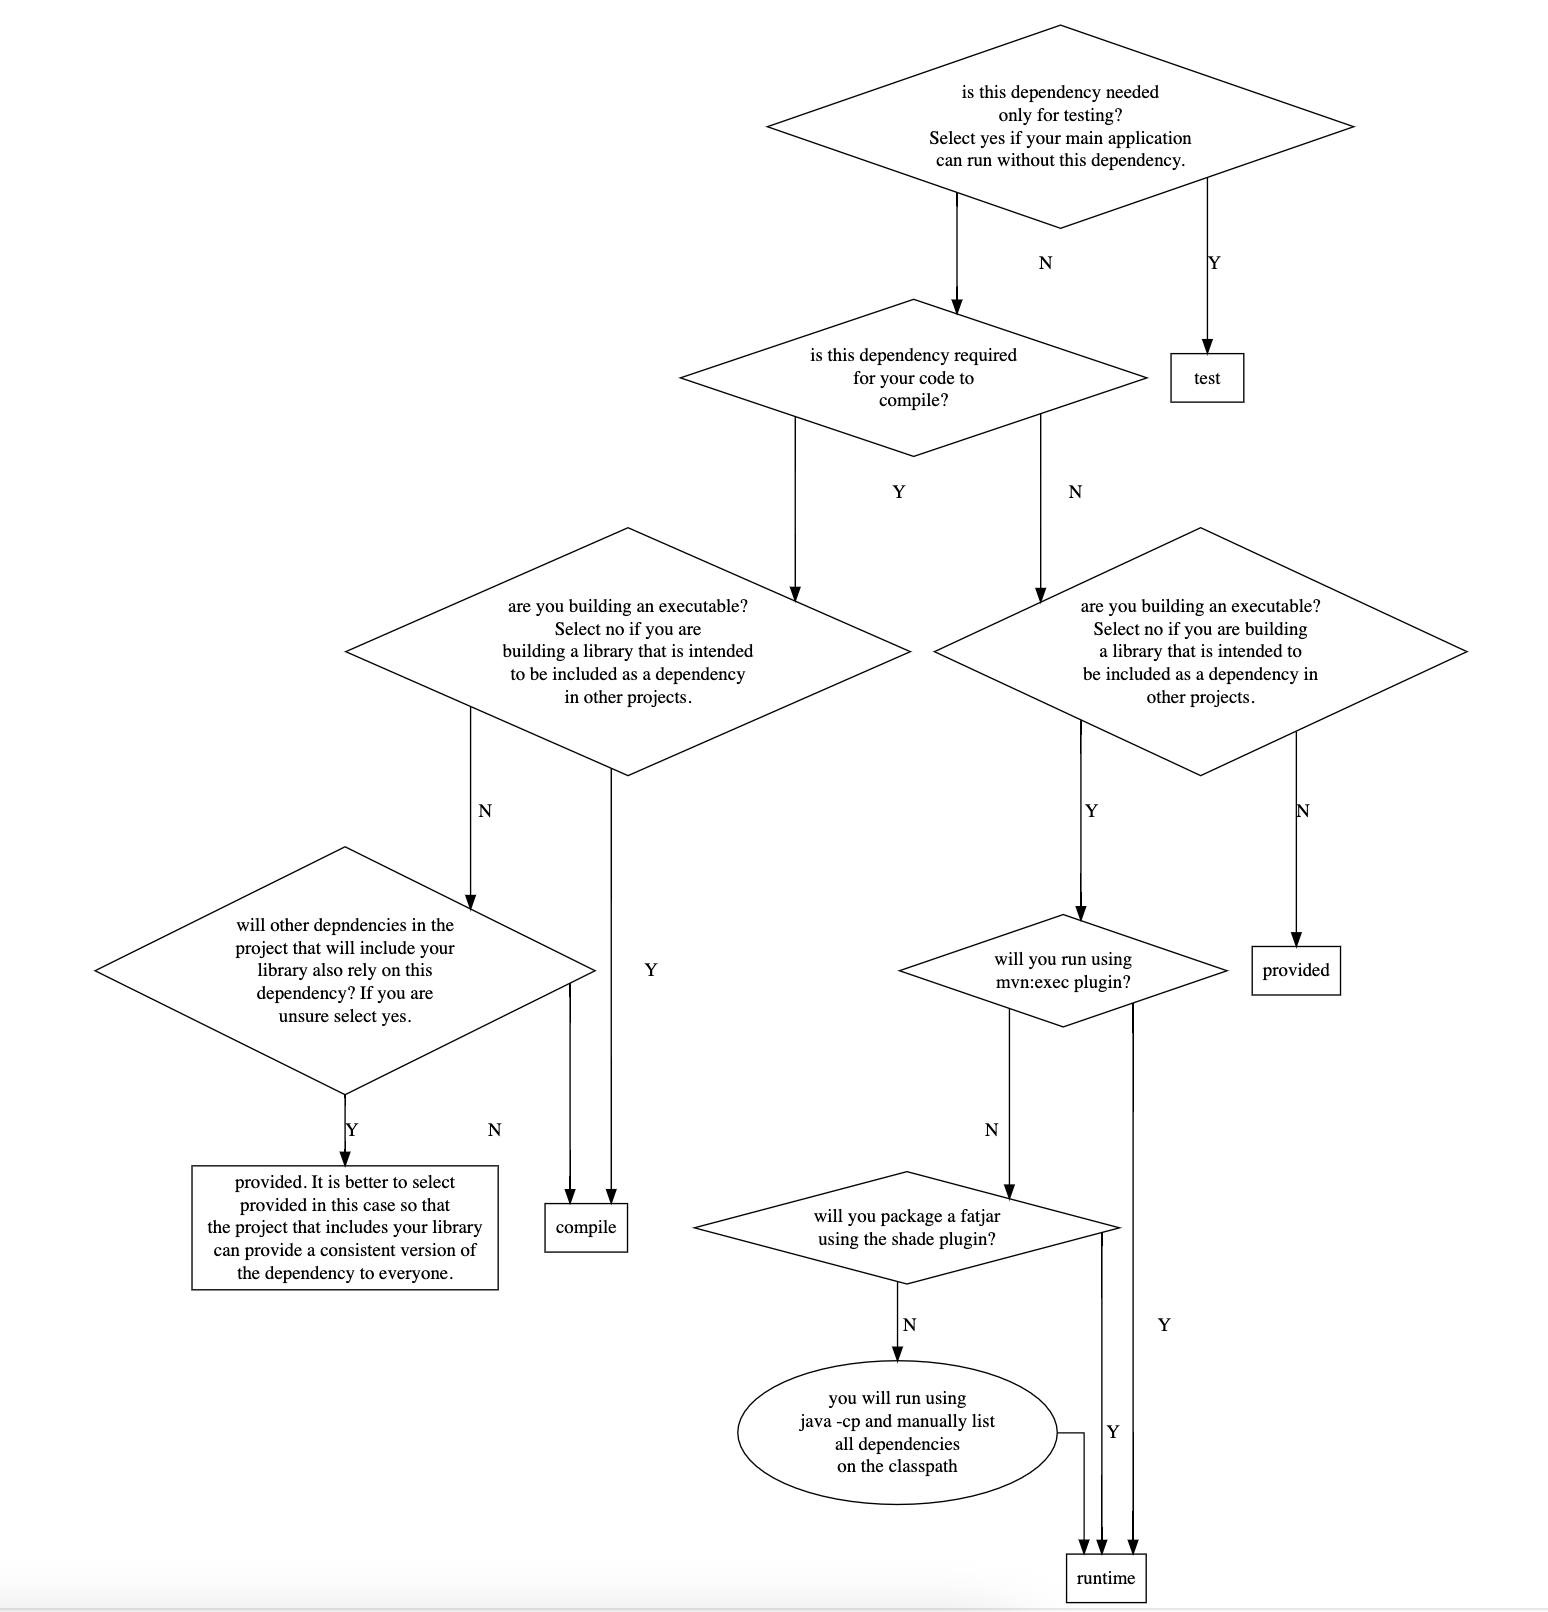
Flowchart to help in deciding Maven dependency Scope
This is just my version. I myself get very confused at times deciding the dependency scope (code for the flowchart is here).
- Last thing I will mention is how to execute a different main class using the maven exec plugin. The best way is to specify whatever
mainClassyou want to execute using the-Dexec.mainClassvariable on the command-line but you can also set different main classes inpom.xml. If you want to choose this option, then you define multipleexecutionelements in yourpom.xml. E.g.:
<execution>
                <id>some-execution-id</id>
                    <goals>
                        <goal>java</goal>
                    </goals>
                    <configuration>
                <mainClass>py4j.Py4jWrapper</mainClass>
            </configuration>
                </execution>
and on the command-line you will use following command:
mvn exec:java@some-execution-id
- How do you use preview features just as Vector API with Maven? There are 2 things you need to do: first, is configuring maven compiler plugin as follows:
<plugin>
                <groupId>org.apache.maven.plugins</groupId>
                <artifactId>maven-compiler-plugin</artifactId>
                <version>3.8.1</version>
                <configuration>
                    <source>20</source>
                    <target>20</target>
                    <compilerArgs>
                        <arg>--enable-preview</arg>
                        <arg>--add-modules</arg>
                        <arg>jdk.incubator.vector</arg>
                    </compilerArgs>

                </configuration>
            </plugin>
You are not done yet. You also need to enable the same flags during execution using MAVEN_OPTS:
MAVEN_OPTS="--enable-preview --add-modules jdk.incubator.vector" \
mvn exec:java
Attempts to enable the flags using any other way will be futile as I learned painfully. It has to be done through MAVEN_OPTS.
- How do you run the
mainmethod in a static inner class using Maven? Use below syntax:
mvn exec:java -Dexec.mainClass='my.package.OuterClass$InnerClass'
The inner class has to be marked public or there will be an error.
- Sometimes you need to use
--add-opens ${module}/${package}to open up the internals of a package in a Java module. You can add it toMAVEN_OPTSbut as I learnt painfully while adding it toMAVEN_OPTSworks formvn exec:java, it does NOT work formvn test[1].mvn testignores any--add-opensdirectives specified inMAVEN_OPTS. To get around the limitation, run your tests that require--add-opensusing thejavacommand like below (shown using JUnit4 test runner as example):
java \
-cp $CLASSPATH \
--add-opens java.base/sun.nio.ch=ALL-UNNAMED \
--add-opens java.base/java.nio=ALL-UNNAMED \
--add-opens java.base/java.util.concurrent=ALL-UNNAMED \
--add-opens java.base/java.util.concurrent.atomic=ALL-UNNAMED \
--add-opens java.base/java.util.concurrent.locks=ALL-UNNAMED \
--add-opens java.base/java.util=ALL-UNNAMED \
org.junit.runner.JUnitCore \
com.mycompany.app.BdbTest
If you like watching a video, I recommend this.
- While using Maven, take care not to set any properties/flags in the
<configuration>section of a plugin e.g., see this. The reason is that if you do this, you will not be able to override the settings from command-line. Instead of having the command-line overridepom.xml, Maven overrides the command-line withpom.xml. How infinitely stupid! - If you use
mvn exec:javato run a program, understand how it operates as it introduces some nuances and may create unexpected warnings due to the fact that your program is not executed on the main thread. e.g., see this.
Basics
Maven has concept of lifecycles -> phases -> goals. Plugins bind to phases. To execute a phase Maven delegates the execution to a plugin. When you run a Maven command e.g. when you run:
mvn installYou are executing the install phase. Running install will also run all the previous phases in the lifecycle its associated with.
<phases>
  <phase>validate</phase>
  <phase>initialize</phase>
  <phase>generate-sources</phase>
  <phase>process-sources</phase>
  <phase>generate-resources</phase>
  <phase>process-resources</phase>
  <phase>compile</phase>
  <phase>process-classes</phase>
  <phase>generate-test-sources</phase>
  <phase>process-test-sources</phase>
  <phase>generate-test-resources</phase>
  <phase>process-test-resources</phase>
  <phase>test-compile</phase>
  <phase>process-test-classes</phase>
  <phase>test</phase>
  <phase>prepare-package</phase>
  <phase>package</phase>
  <phase>pre-integration-test</phase>
  <phase>integration-test</phase>
  <phase>post-integration-test</phase>
  <phase>verify</phase>
  <phase>install</phase>
  <phase>deploy</phase>
</phases>
Here you can see what plugin Maven executes to execute a phase for the jar packaging:
<phases>
  <process-resources>
    org.apache.maven.plugins:maven-resources-plugin:2.6:resources
  </process-resources>
  <compile>
    org.apache.maven.plugins:maven-compiler-plugin:3.1:compile
  </compile>
  <process-test-resources>
    org.apache.maven.plugins:maven-resources-plugin:2.6:testResources
  </process-test-resources>
  <test-compile>
    org.apache.maven.plugins:maven-compiler-plugin:3.1:testCompile
  </test-compile>
  <test>
    org.apache.maven.plugins:maven-surefire-plugin:2.12.4:test
  </test>
  <package>
    org.apache.maven.plugins:maven-jar-plugin:2.4:jar
  </package>
  <install>
    org.apache.maven.plugins:maven-install-plugin:2.4:install
  </install>
  <deploy>
    org.apache.maven.plugins:maven-deploy-plugin:2.7:deploy
  </deploy>
</phases>
As I understand mvn command has two forms:
mvn phase
mvn plugin:goal
e.g. when we run mvn compile we are invoking the well-defined compile phase and this phase maps to compile goal of org.apache.maven.plugins:maven-compiler-plugin by default. In contrast, when we run
mvn spring-boot:runwe are telling directly the goal and plugin to execute.
Each goal is a MOJO – Maven Old Java Object. To debug with Maven use mvndebug (alternatively use jdb to debug directly without Maven).
How to override the default plugin associated with a phase?
When we declare a plugin in pom.xml under:
<build>
  <plugins>
    <plugin>
we are essentially overriding the default plugin associated with a phase. You can use this to e.g., use the shade plugin to package your jar instead of the default maven-jar-plugin.
Homework
Think you know Maven? How about filling this table with a ✔ or ×
| scope | mvn compile | mvn test | mvn exec | mvn package | mvn test-compile | mvn dependency:build-classpath |
|---|---|---|---|---|---|---|
| compile | ||||||
| test | ||||||
| runtime | ||||||
| provided | ||||||
re: mvn package, the question is to tell whether a dependency will be included in the fat jar or not when running mvn package with the shade plugin. I don’t recommend using assembly plugin and for spring boot you should use spring-boot-maven-plugin for building a fat jar.
Other Tips
Today I learned this command from ChatGPT:
tr '\0' ' ' < /proc/<PID>/cmdlineIts an incredibly useful command as it shows the command that launched a Linux process. E.g., when you run a spring boot application using mvn spring-boot:run, above command can reveal the command that Maven runs behind-the-scenes that actually spins up the java process. It looks like this e.g.:
/home/ubuntu/jdk-21.0.6/bin/java -classpath /home/ubuntu/apache-maven-3.9.9/boot/plexus-classworlds-2.8.0.jar -Dclassworlds.conf=/home/ubuntu/apache-maven-3.9.9/bin/m2.conf -Dmaven.home=/home/ubuntu/apache-maven-3.9.9 -Dlibrary.jansi.path=/home/ubuntu/apache-maven-3.9.9/lib/jansi-native -Dmaven.multiModuleProjectDirectory=/home/ubuntu/project-dir org.codehaus.plexus.classworlds.launcher.Launcher spring-boot:run -Dspring-boot.run.jvmArguments=-Djava.library.path=lib -DJWT_SECRET_KEY= -Dspring-boot.run.main-class=my.web.WebApplication -Dspring-boot.run.arguments=--server.port=8080 It looks like there are 2 java processes that are spawned. One is above and there is yet another java process that is like below:
/home/ubuntu/jdk-21.0.6/bin/java -XX:TieredStopAtLevel=1 -Djava.library.path=lib -DJWT_SECRET_KEY= -cp <full_class_path> my.web.WebApplication --server.port=8080This is incredibly useful as it gives you the full classpath you need if you later want to launch without Maven. Many times I have to use Maven just to launch an application as constructing the humunguous classpath is impossible manually.
