
We start with functional requirements:
- a React control that allows user to select multiple files for uploading to a server
- user should be able to order the files (i.e., the order of files matters)
- user should be able to delete (remove) files from the selection
Bonus:
- the application can set a limit on the number of files user can select for uploading
- the application can set a limit on the maximum individual file size. user cannot select file more than max file size
- the application can predefine the file types user can select (e.g., only png and jpg images)
This seems like a common enough scenario but surprisingly there is no generic control in HTML with above features. HTML comes with <input type="file"> element which we will use as the foundation of the control we are developing. Familiarize yourself with this HTML element before proceeding ahead.
Ready? Let’s get started.
Step 0: Install Node.js and CRA (create-react-scripts)
Step 1: Run npm init to create a new Node.js project
A note: even though we are creating a Node.js project, the React control we are developing is going to run on a browser. Remember Node.js is server side technology. Your browser (Chrome) does not run Node.js. It provides a JavaScript execution environment but that is not Node.js. The distinction is important to remember.
Step 2: The React code
If you are new to React, first understand the difference between classic React components (legacy) and the newer functional components (recommended). If you browse code on the web, you are likely to come across both. The two use different programming styles, so it is easy to get confused for a newbie. Also the functional components are NOT stateless. They are called functional because they don’t use classes. We will create a functional component.
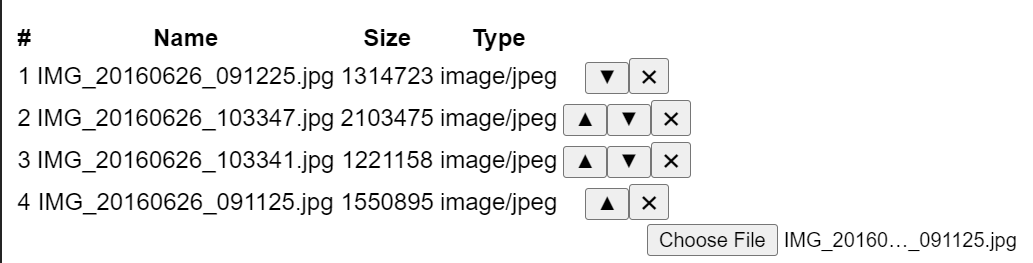
The heart of the component will be a list object which is nothing but the list of files that the user has selected. The order of items matters in this list. This list is used to render a HTML table which displays metadata about a file (such as filename, size file type etc.) together with buttons to reorder items in the list or remove them. A picture is worth a thousand words so see the example below:
React will react to changes in this list and automatically update the HTML table without us having to do anything. That’s why its called React btw – because it reacts to changes in variables. These variables are known as observables and reminds me of an old library KnockoutJS that I used once long before React appeared. The pattern is known as the Observer pattern in programming.
Here is the skeleton of our React component:
import React, { useState } from "react";

const FileInput = ({ onChange, maxFileSize, accept, maxFileCount }) => {
  const [list, setList] = useState([]);

  const handleUp = (e, i) => {
    // handle up button and re-order list accordingly
  };

  const handleDown = (e, i) => {
    // handle down button and reorder list accordingly
  };

  const handleDelete = (e, i) => {
     // remove item from the list
  };

  const validate = (file) => {
    // validate that file does not exceed predefined maxFileSize
  };

  const renderHtmlTable = () => {
    // render the list as an HTML table
  };

  const renderFileInput = () => {
    // render <input type="file"> HTML element which allows user to add items to the list
  };

  return (
    <>
      {renderHtmlTable()}
      {renderFileInput()}
    </>
  );
}

export default FileInput;
Completing the methods is left as exercise for the reader. Explanation of the arguments:
onChange: an event handler that is called whenever the file list changes (addition, deletion or change in order of items in the list)maxFileSize: a number. units: bytes. user is not allowed to select a file whose size is greater thanmaxFileSize.accept: same as accept. a string that defines the file types the file input should accept.maxFileCount: used to limit the number of files user can select.
The useState method is how functional components access state in React. Familiarize yourself with it in case you don’t know about it.
The component requires react and react-dom dependencies to function. These dependencies should be declared under peerDependencies section in package.json to avoid having two copies of React in the final application which gives a runtime error if that happens.
Step 3: Building and packaging the code
JSX code has to be compiled to JavaScript for browsers to understand. For this we use babel. The component in this case is small (just one file) so we don’t need any fancy packaging but for bigger projects we can use webpack or rollup. webpack can call babel for you as shown below (this code will go in webpack.config.js):
module.exports = {
    entry: "./src/FileInput.js",
    output: {
      path: path.resolve(__dirname, 'dist'),
      filename: "main.js",
      library: pkg.name,
      libraryTarget: "umd",
      umdNamedDefine: true
    },
    module: {
      rules: [
        {
          test: /\.(js|jsx)$/,
          exclude: /node_modules/,
          use: {
            loader: "babel-loader"
          }
        },
The babel and webpack dependencies should go under devDependencies in package.json since you only need them in the build process. The built code (i.e., the code that you release) does not need them.
If you are writing in TypeScript then just add
"jsx": "react-jsx"
under the compilerOptions section of your tsconfig.json. The TS compiler will take care of compiling JSX to JS.
Step 4: Testing the code
To test the module before publishing to npm, pack it as a tarball:
$ npm pack
This will pack all the files under files in package.json and create a tarball (.tgz file). Then copy this tarball to your test project and install it by running:
$ npm i siddjain-react-bootstrap-file-input-1.0.0.tgz
Some online docs suggest using npm link to test a package locally before publishing to npm. In my experience, do NOT use npm link otherwise you run into invalid hook call.
